Kubeflow Pipelines
What is a pipeline?
A pipeline is a description of an ML workflow, including all of the components in the workflow and how they combine in the form of a graph. The pipeline includes the definition of the inputs (parameters) required to run the pipeline and the inputs and outputs of each component.
A pipeline component is a self-contained set of user code, packaged as a Docker image, that performs one step in the pipeline. For example, a component can be responsible for data preprocessing, data transformation, model training, and so on.
Using Kubeflow Pipelines
You can write the pipeline as a Python script. After developing your pipeline, you can upload and share it on the Kubeflow Pipelines UI. Finally, you can trigger the pipeline from the Kubeflow Pipelines UI, which is the easiest way to do it.
Examples
For en end-to-end example of how to write and execute a Kubeflow pipeline from within a Jupyter Notebook / Python script in Kubeflow, go to the following file:
Using Elyra with Kubeflow Pipelines
Don't use Elyra in production (prod) environments, only in development (dev) environments.
Elyra is a set of AI-focused extensions for JupyterLab and Kubeflow Notebooks that simplify the creation and management of machine learning workflows. Its key feature is the Visual Pipeline Editor, which allows users to build pipelines visually using Jupyter notebooks, Python scripts, or R scripts as modular components.
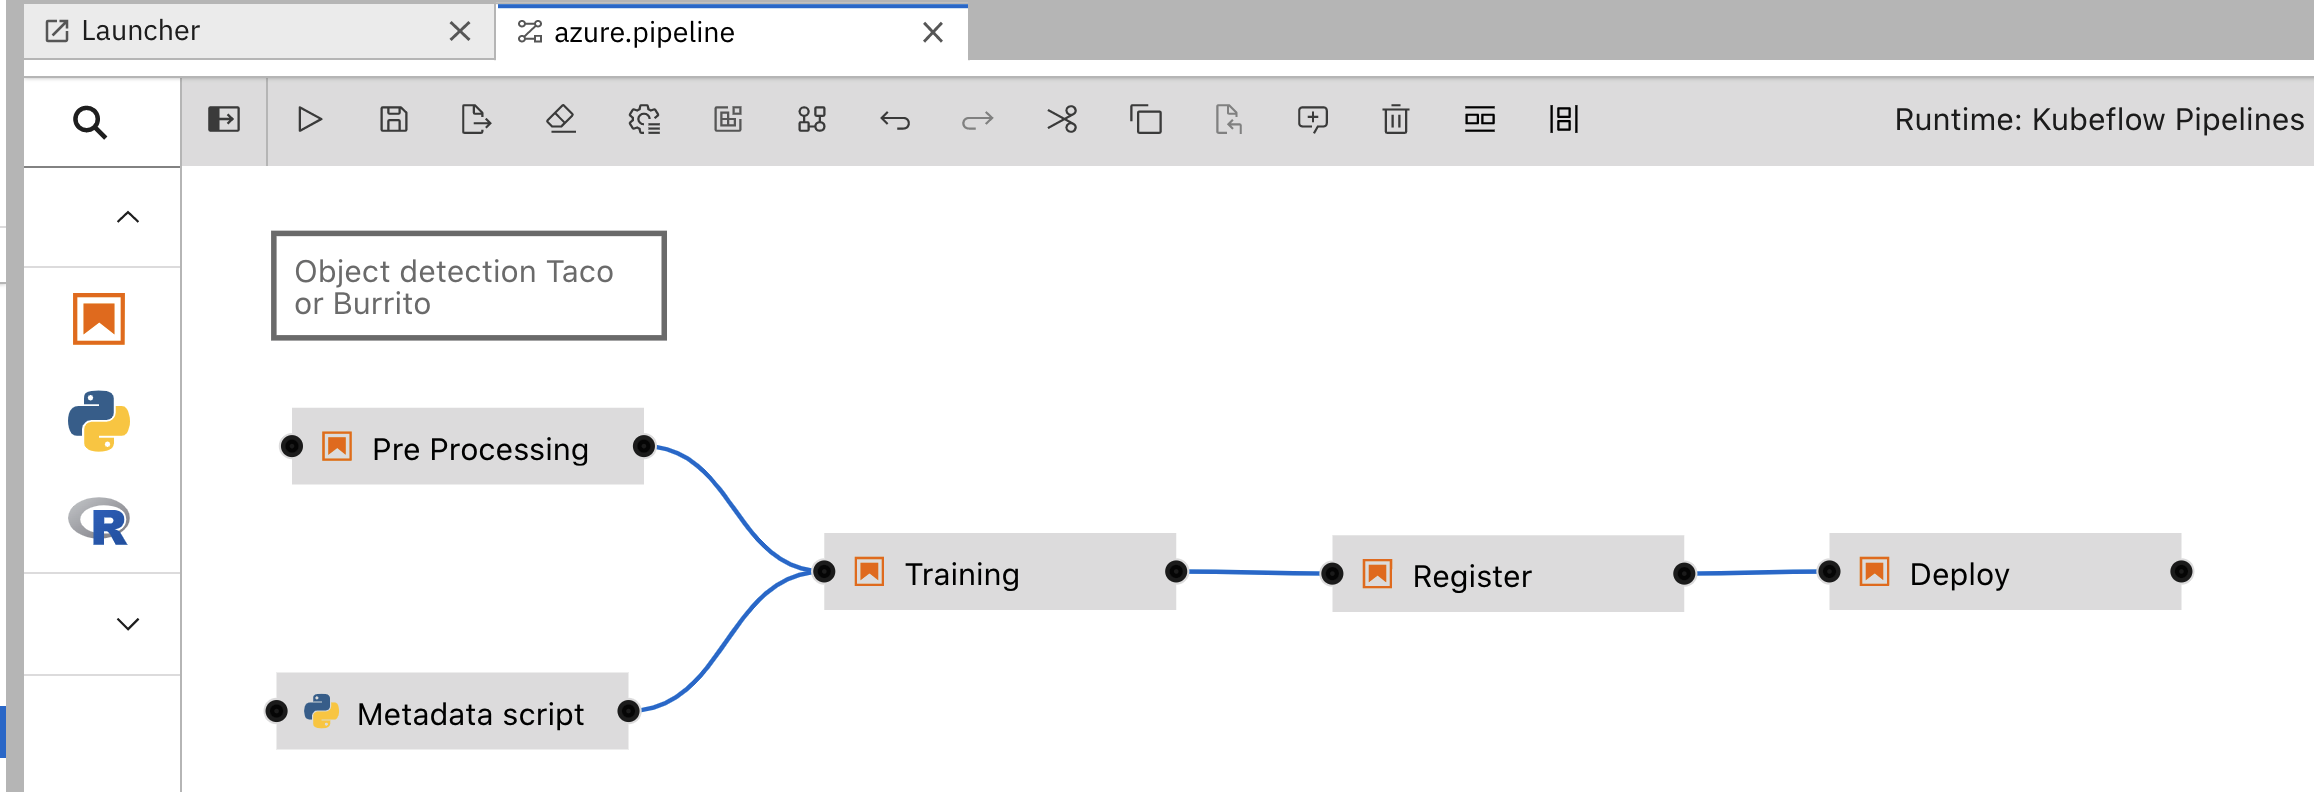 Sample flow in Elyra Visual Editor
These workflows can be executed locally in JupyterLab or remotely on orchestration platforms such as Kubeflow Pipelines or Apache Airflow. Elyra streamlines the process of converting multiple notebooks or scripts into reproducible batch jobs or workflows, making it easier to manage complex ML projects.
Pipeline Automation by Elyra brings some unique advantages:
- Quicker pipeline development through a drag-and-drop visual editor.
- Generate pipelines and components by dragging and connecting Jupyter Notebooks and Python scripts.
- Configure each step in a visual editor as a Dockerized container along with desired compute resources (CPU/GPU/RAM)
- Configure input file dependencies, declare output files, connect persistent storage and specific environment variables from the visual UI editor.
- Export the pipeline as a Python or YAML file.
- Reduce the learning curve for data scientists in building and executing pipelines.
- Test as a local pipeline in Jupyter Notebook Server environments before executing as a Kubeflow pipeline.
- Create code snippets.
- Save reusable pipeline components in component catalog.
- Configure pipeline parameters from visual editor.
The following IBM article provides a good introduction to Elyra and its capabilities:
Instructions from Elyra's documentation on how to put together a Component Catalog:
Getting started with Elyra
To set up a Kubeflow Jupyter Notebook Server with the Elyra Visual Pipeline Editor Extensions on Aurora, the AI Platform team provides a notebook image with Elyra.
Also take into consideration that a basic Elyra environment includes:
- a persistent volume
- a Kubeflow notebook server
- a storage system, Minio for Aurora
- a repository with notebooks files
- some runtime images for the pipeline steps in an Aurora registry (for example,
auroradevacr)
Elyra 3.15.0 is the currently supported version.
Step 1: Set up a volume
It is best practice to create a persistent volume for your work. The Kubeflow Notebook Server form allows you to create a volume on the fly, however it is recommended that you create a ReadWriteMany volume in the Volumes section of Kubeflow before you go on to create a notebook server.
Kubeflow pipelines in general write many times to the storage, therefore you want to have a ReadWriteMany volume.
How to set up a ReadWriteMany volume
-
Open the Kubeflow Central Dashboard and select a namespace to work on.
-
Click Volumes in the side panel.
-
Click + New Volume
-
In the New Volume settings, select the following parameters:
- Name: enter any name
- Volume size in Gi:
10(or as needed) - Storage Class:
standard - AccessMode:
ReadWriteMany
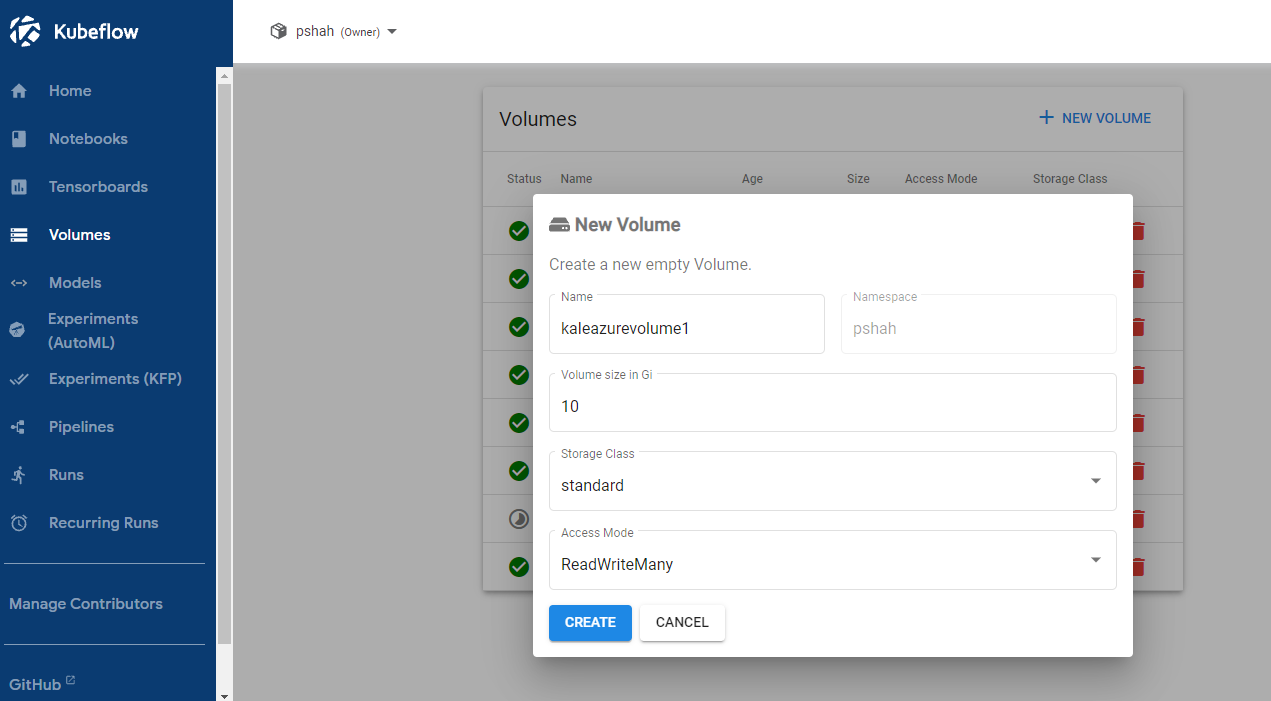 New volume settings
- Click Create.
-
Ensure that the volume appears with a green
Statusin the volumes list.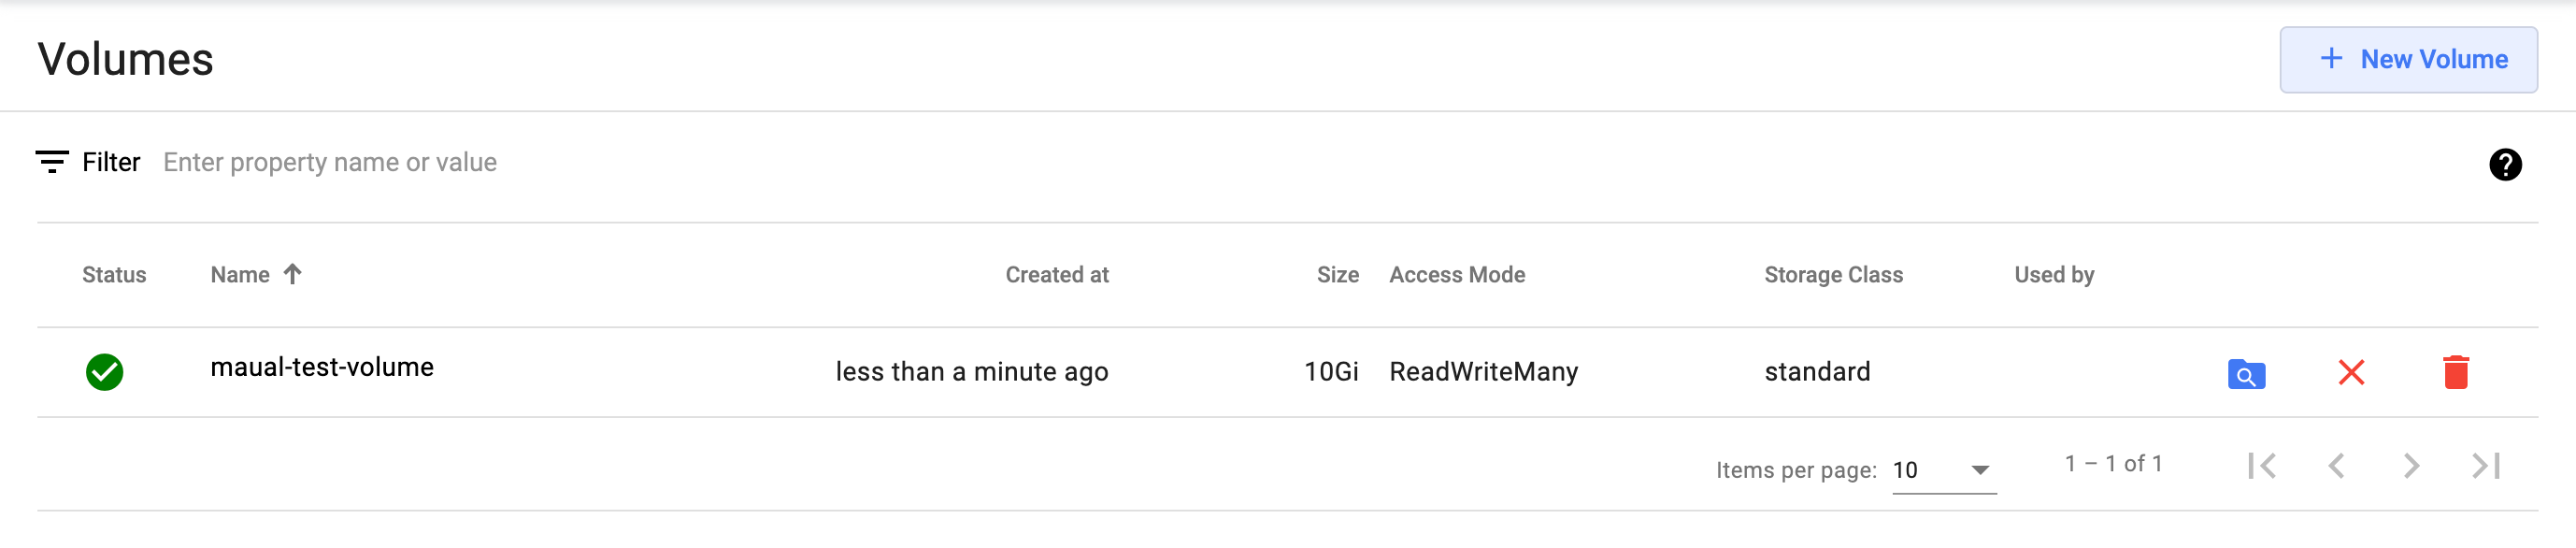
This type of volume can only be assigned to one running notebook server.
For information about using shared volumes, go to Shared Persistent Volume Across Kubernetes Workloads in Different Namespaces
Step 2: Spin an Elyra notebook
-
Go to the Kubeflow Central Dashboard.
-
In the top panel, from the dropdown menu, choose the namespace you want to work on.
-
Click Notebooks in the left navigation menu.
-
Click + New Notebook to open the new notebook server settings form.
-
Enter a Name for the new notebook server.
-
Select JupyterLab.
-
In the Custom Notebook section, select the Custom Image checkbox.
-
In the Custom image field, enter the currently available Elyra image:
auroradevacr.azurecr.io/elyra/kf-notebook:3.15.2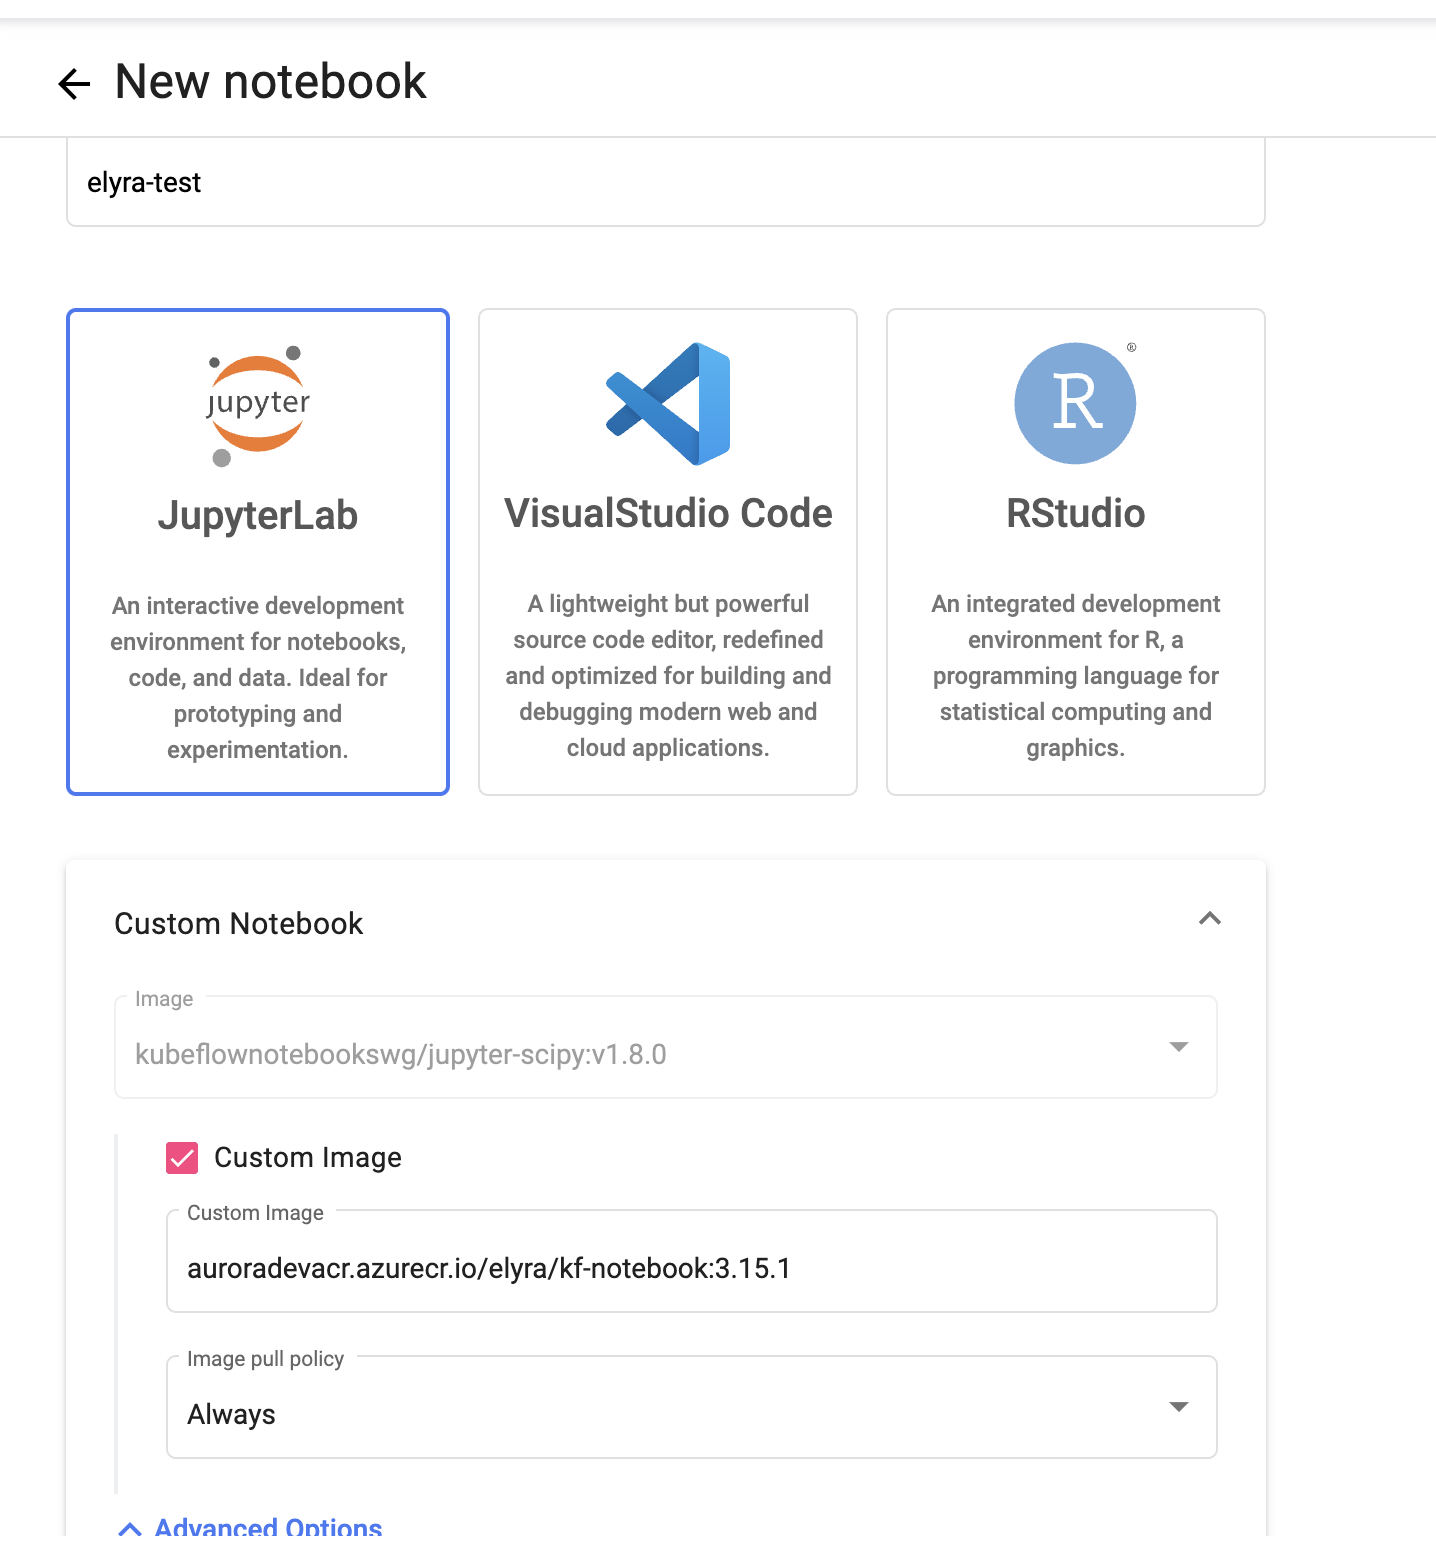 Custom notebook image settingsnote
Go to the
elyra/kf-notebookrepository in the Azure Portal to view the latest available image. -
Set CPU and Memory as needed. For example, CPU:
1, Memory:4 Gi. -
If you think you need GPU power, first contact the AI Platform team since clusters need to support GPU before use. Otherwise, leave the settings as they are.
-
Leave the default values in Workspace Volume. This will create a volume for the notebook.
Do not chooseReadWriteManyhere since it will not work.
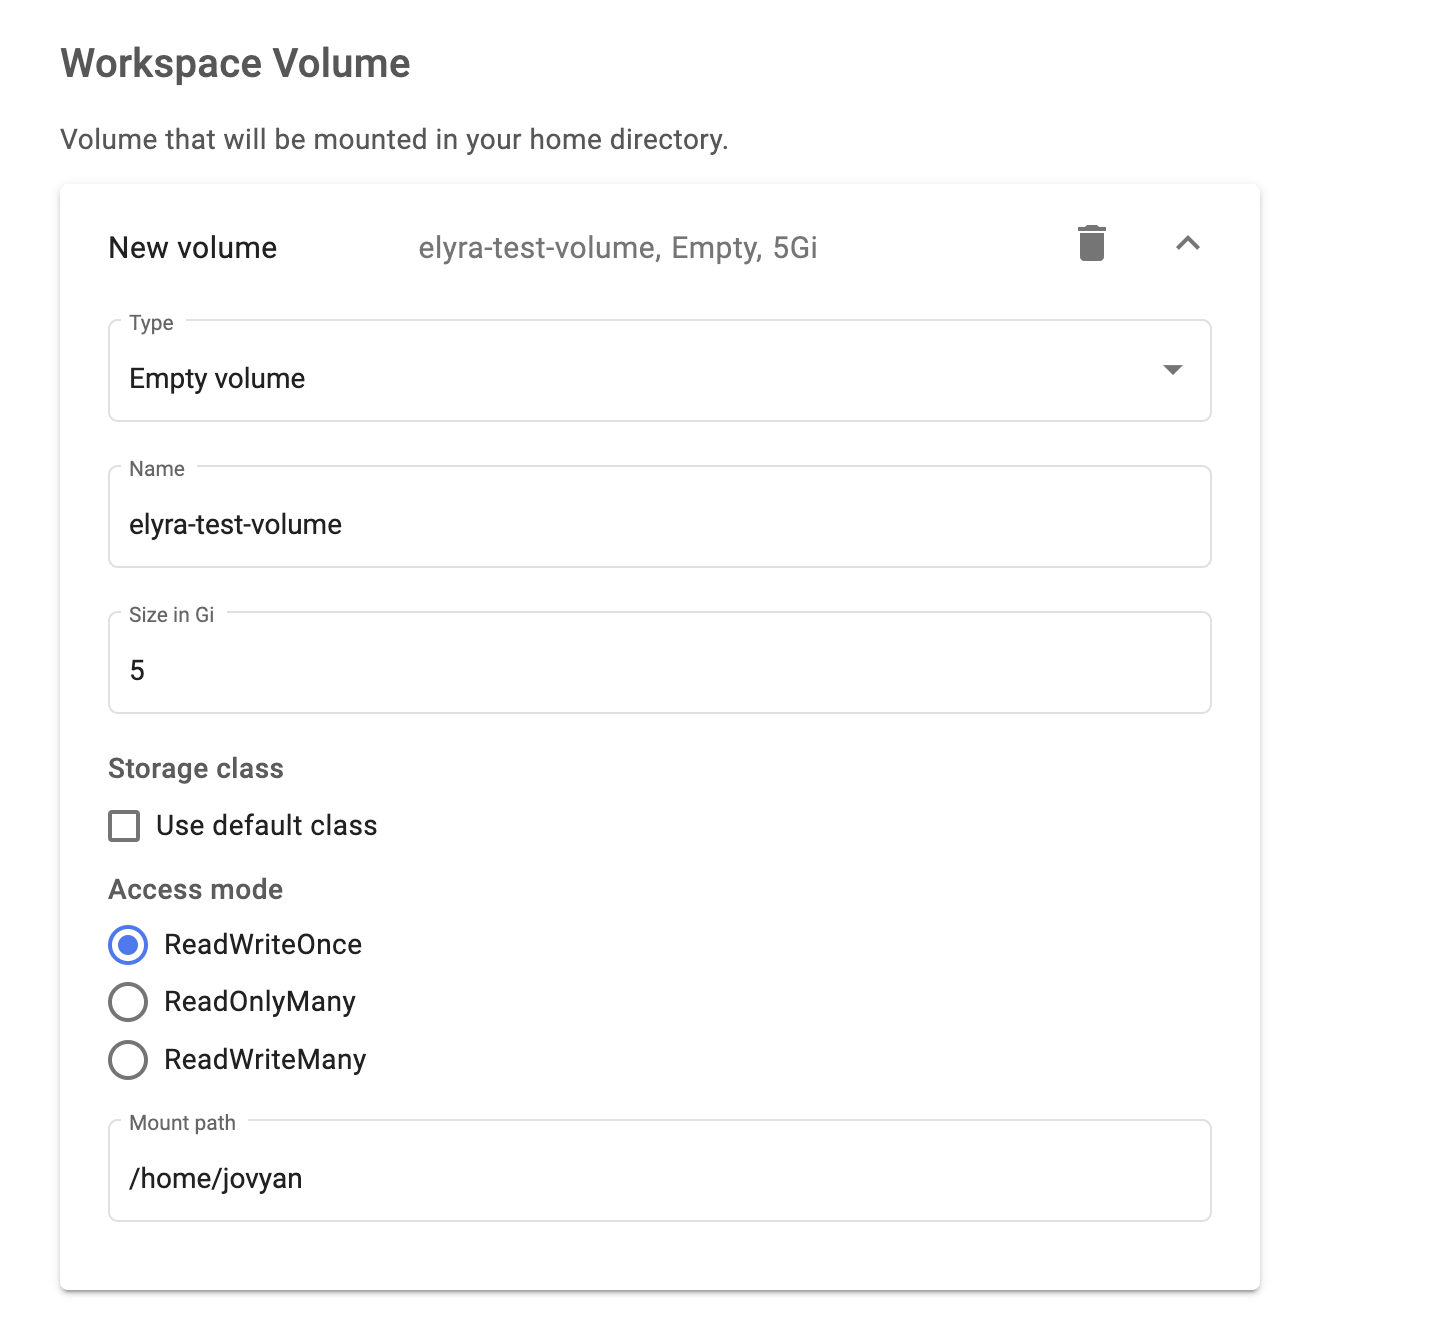 Workspace volume settings
- In the Data Volume section, click + Attach existing volume to attach the volume you created previously. Make sure the name matches the name of the volume you created.
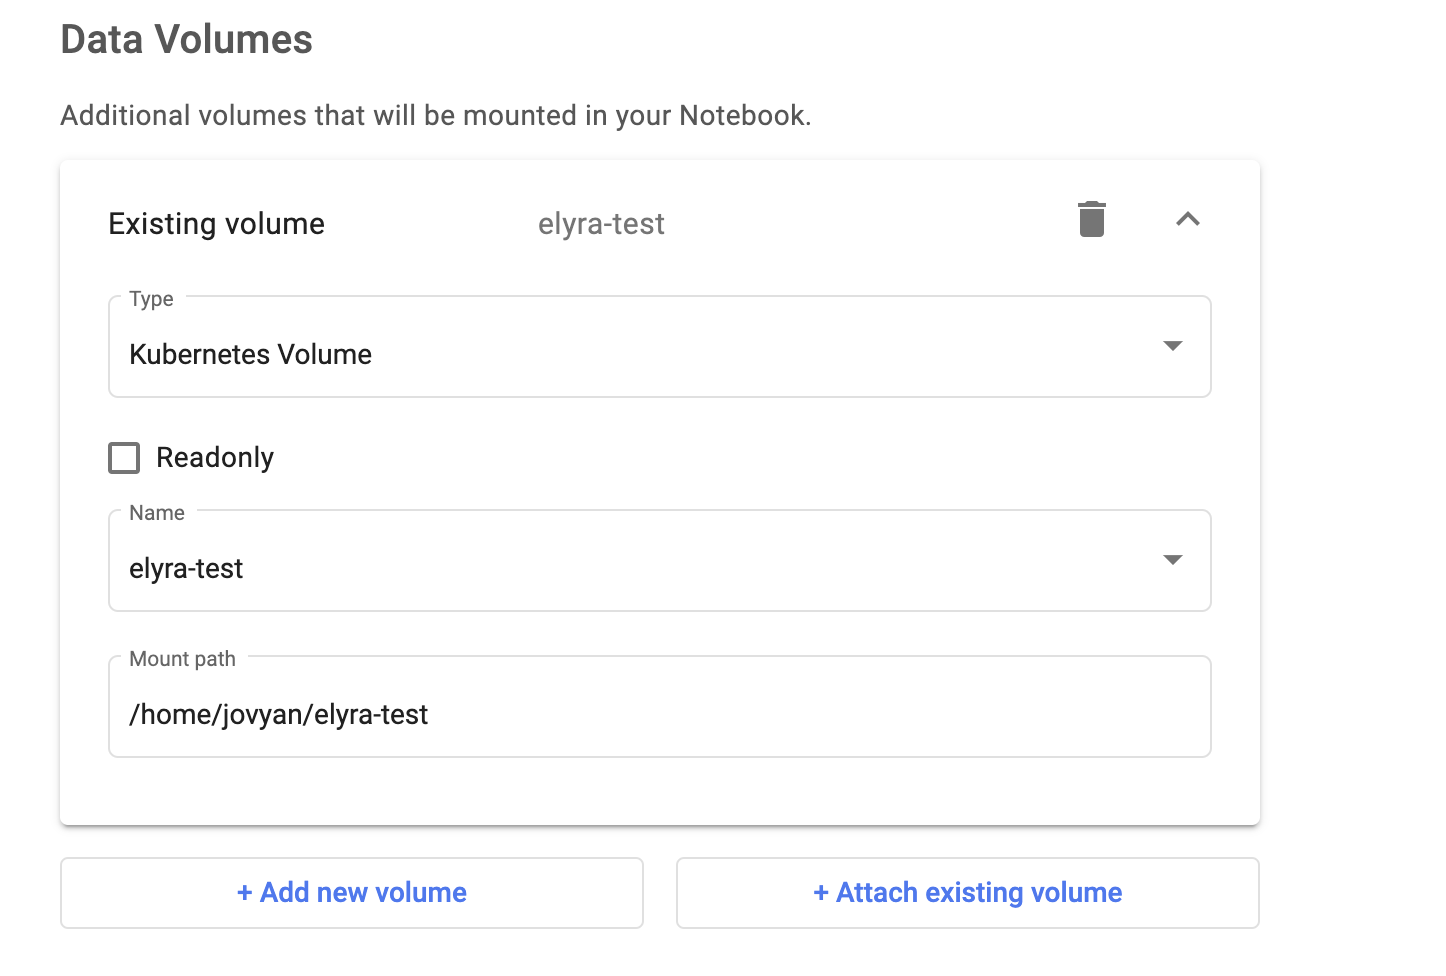 Data volume settings
- Expand the Advanced Options dropdown menu, then:
- In Configurations, select both options.
- In Affinity/Tolerations, choose
Spotin both dropdown menus. This will mount your pod to cheaper resources (Spot Nodes), but might also kill your pod unexpectedly. If this is a deal-breaker, ignore this section.
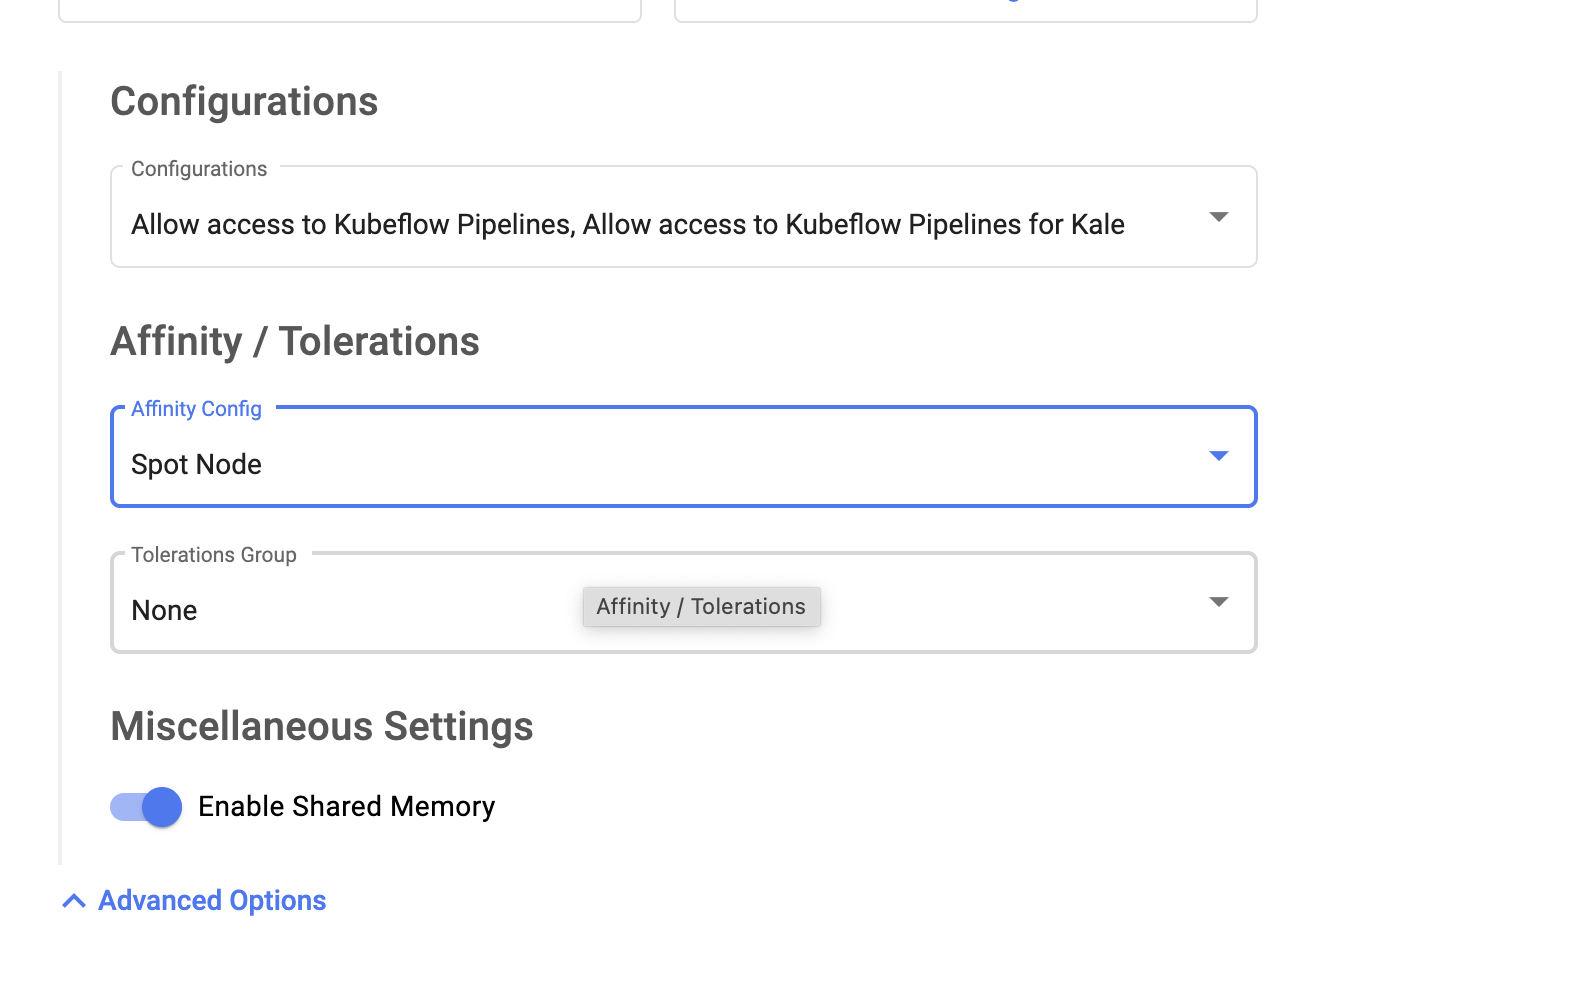 Configurations and Affinity / Tolerations settings
-
Click Launch and wait a couple of minutes (it shouldn't take longer than 10 minutes).
-
The notebook should appear in the Notebooks list.
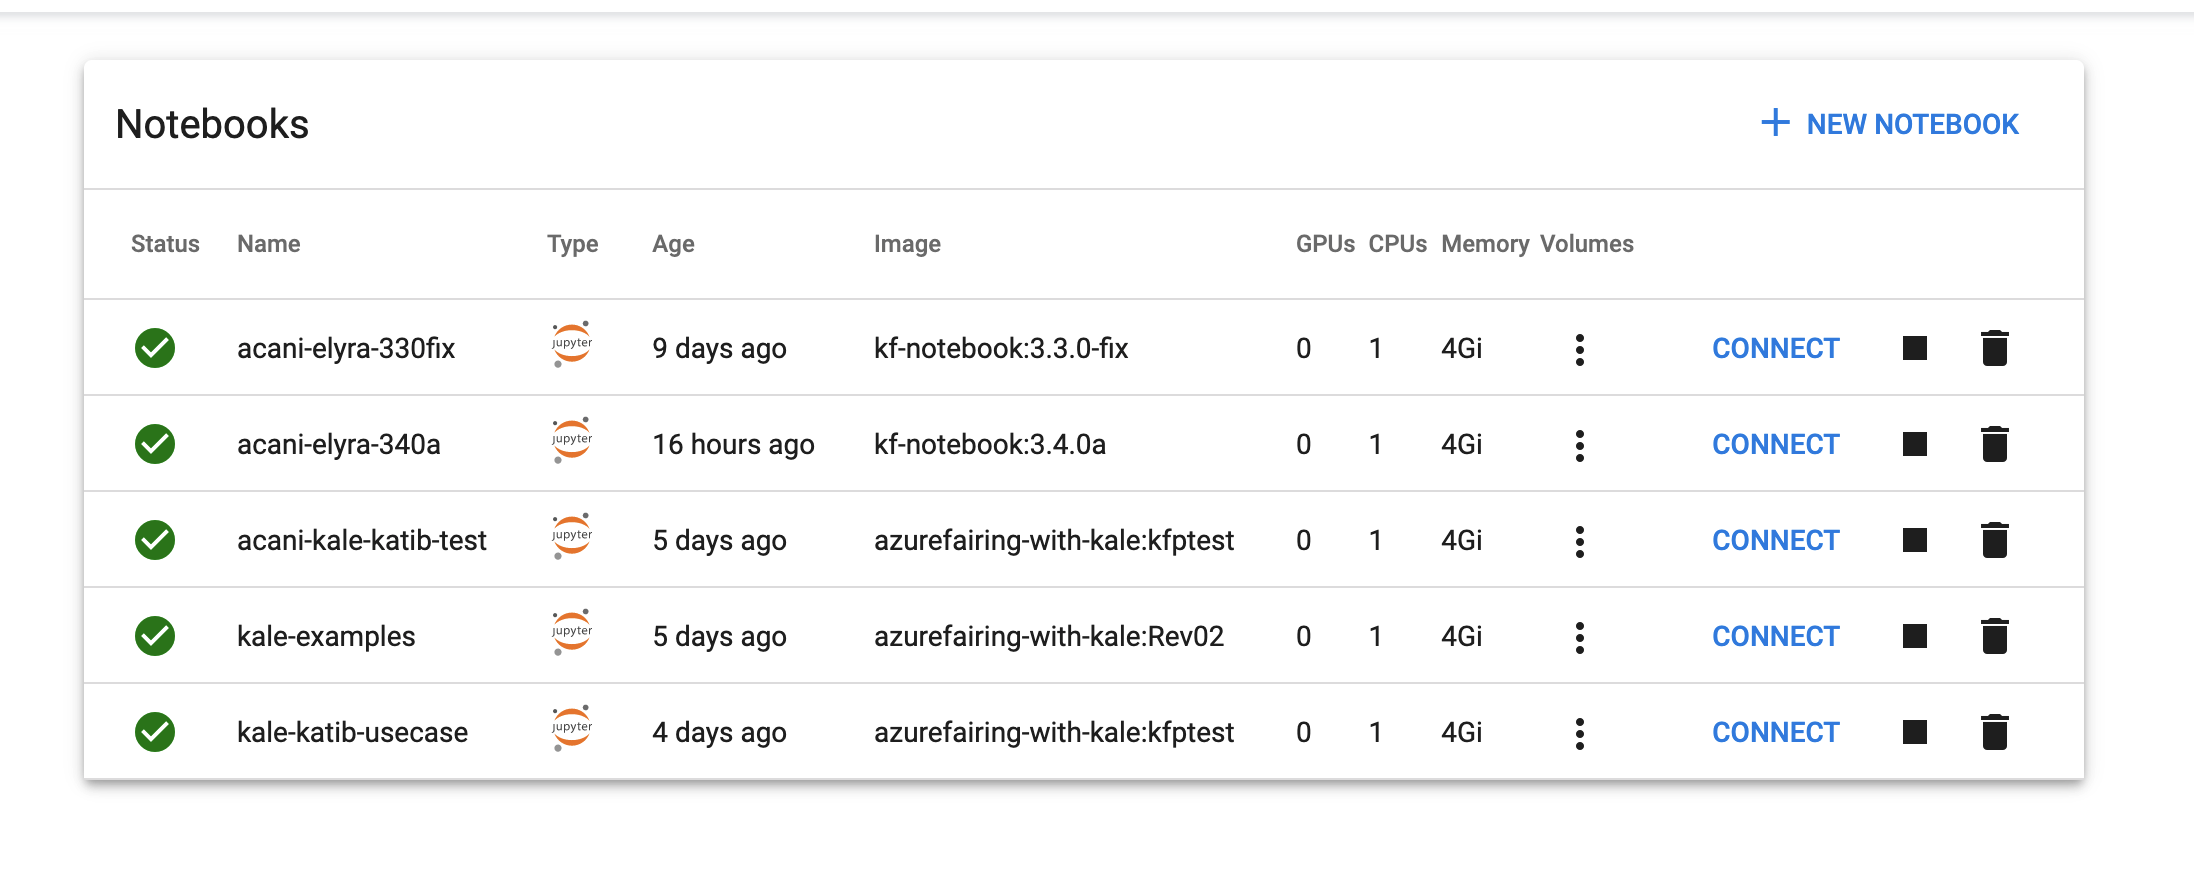 Notebooks list
- On the Notebooks list, click Connect by the notebook you created to launch the Elyra JupyterLab server.
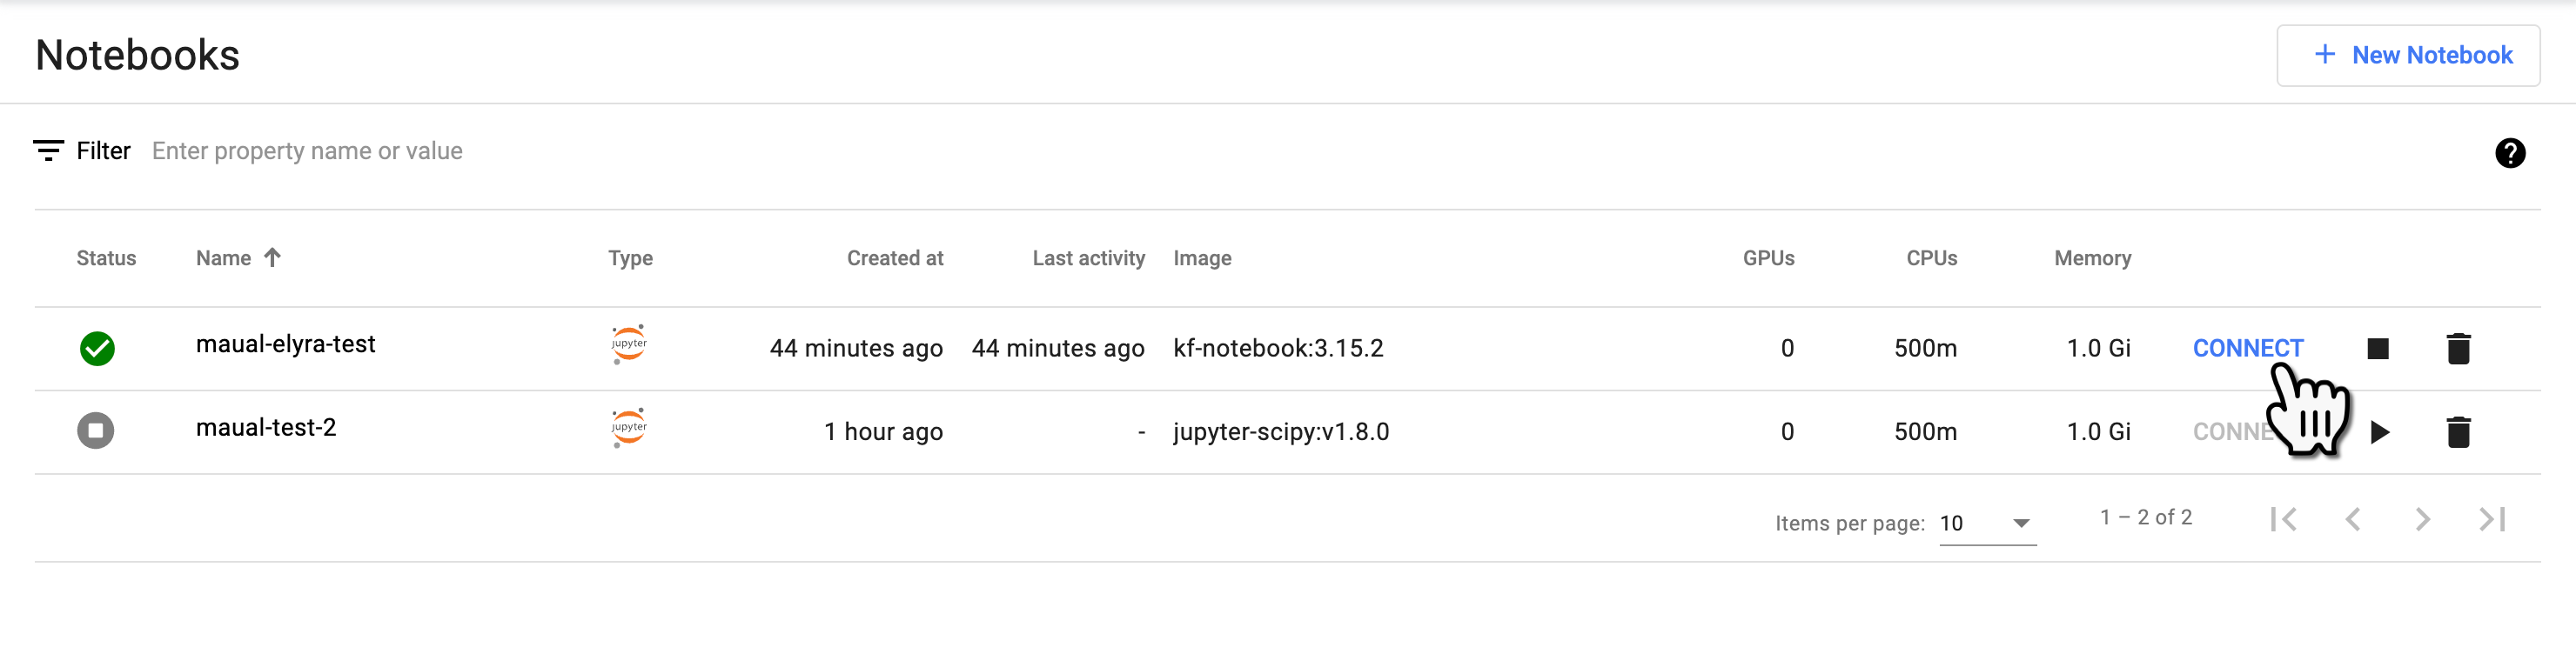 Connect notebook from Notebooks list
- You should then be able to see the following screen:
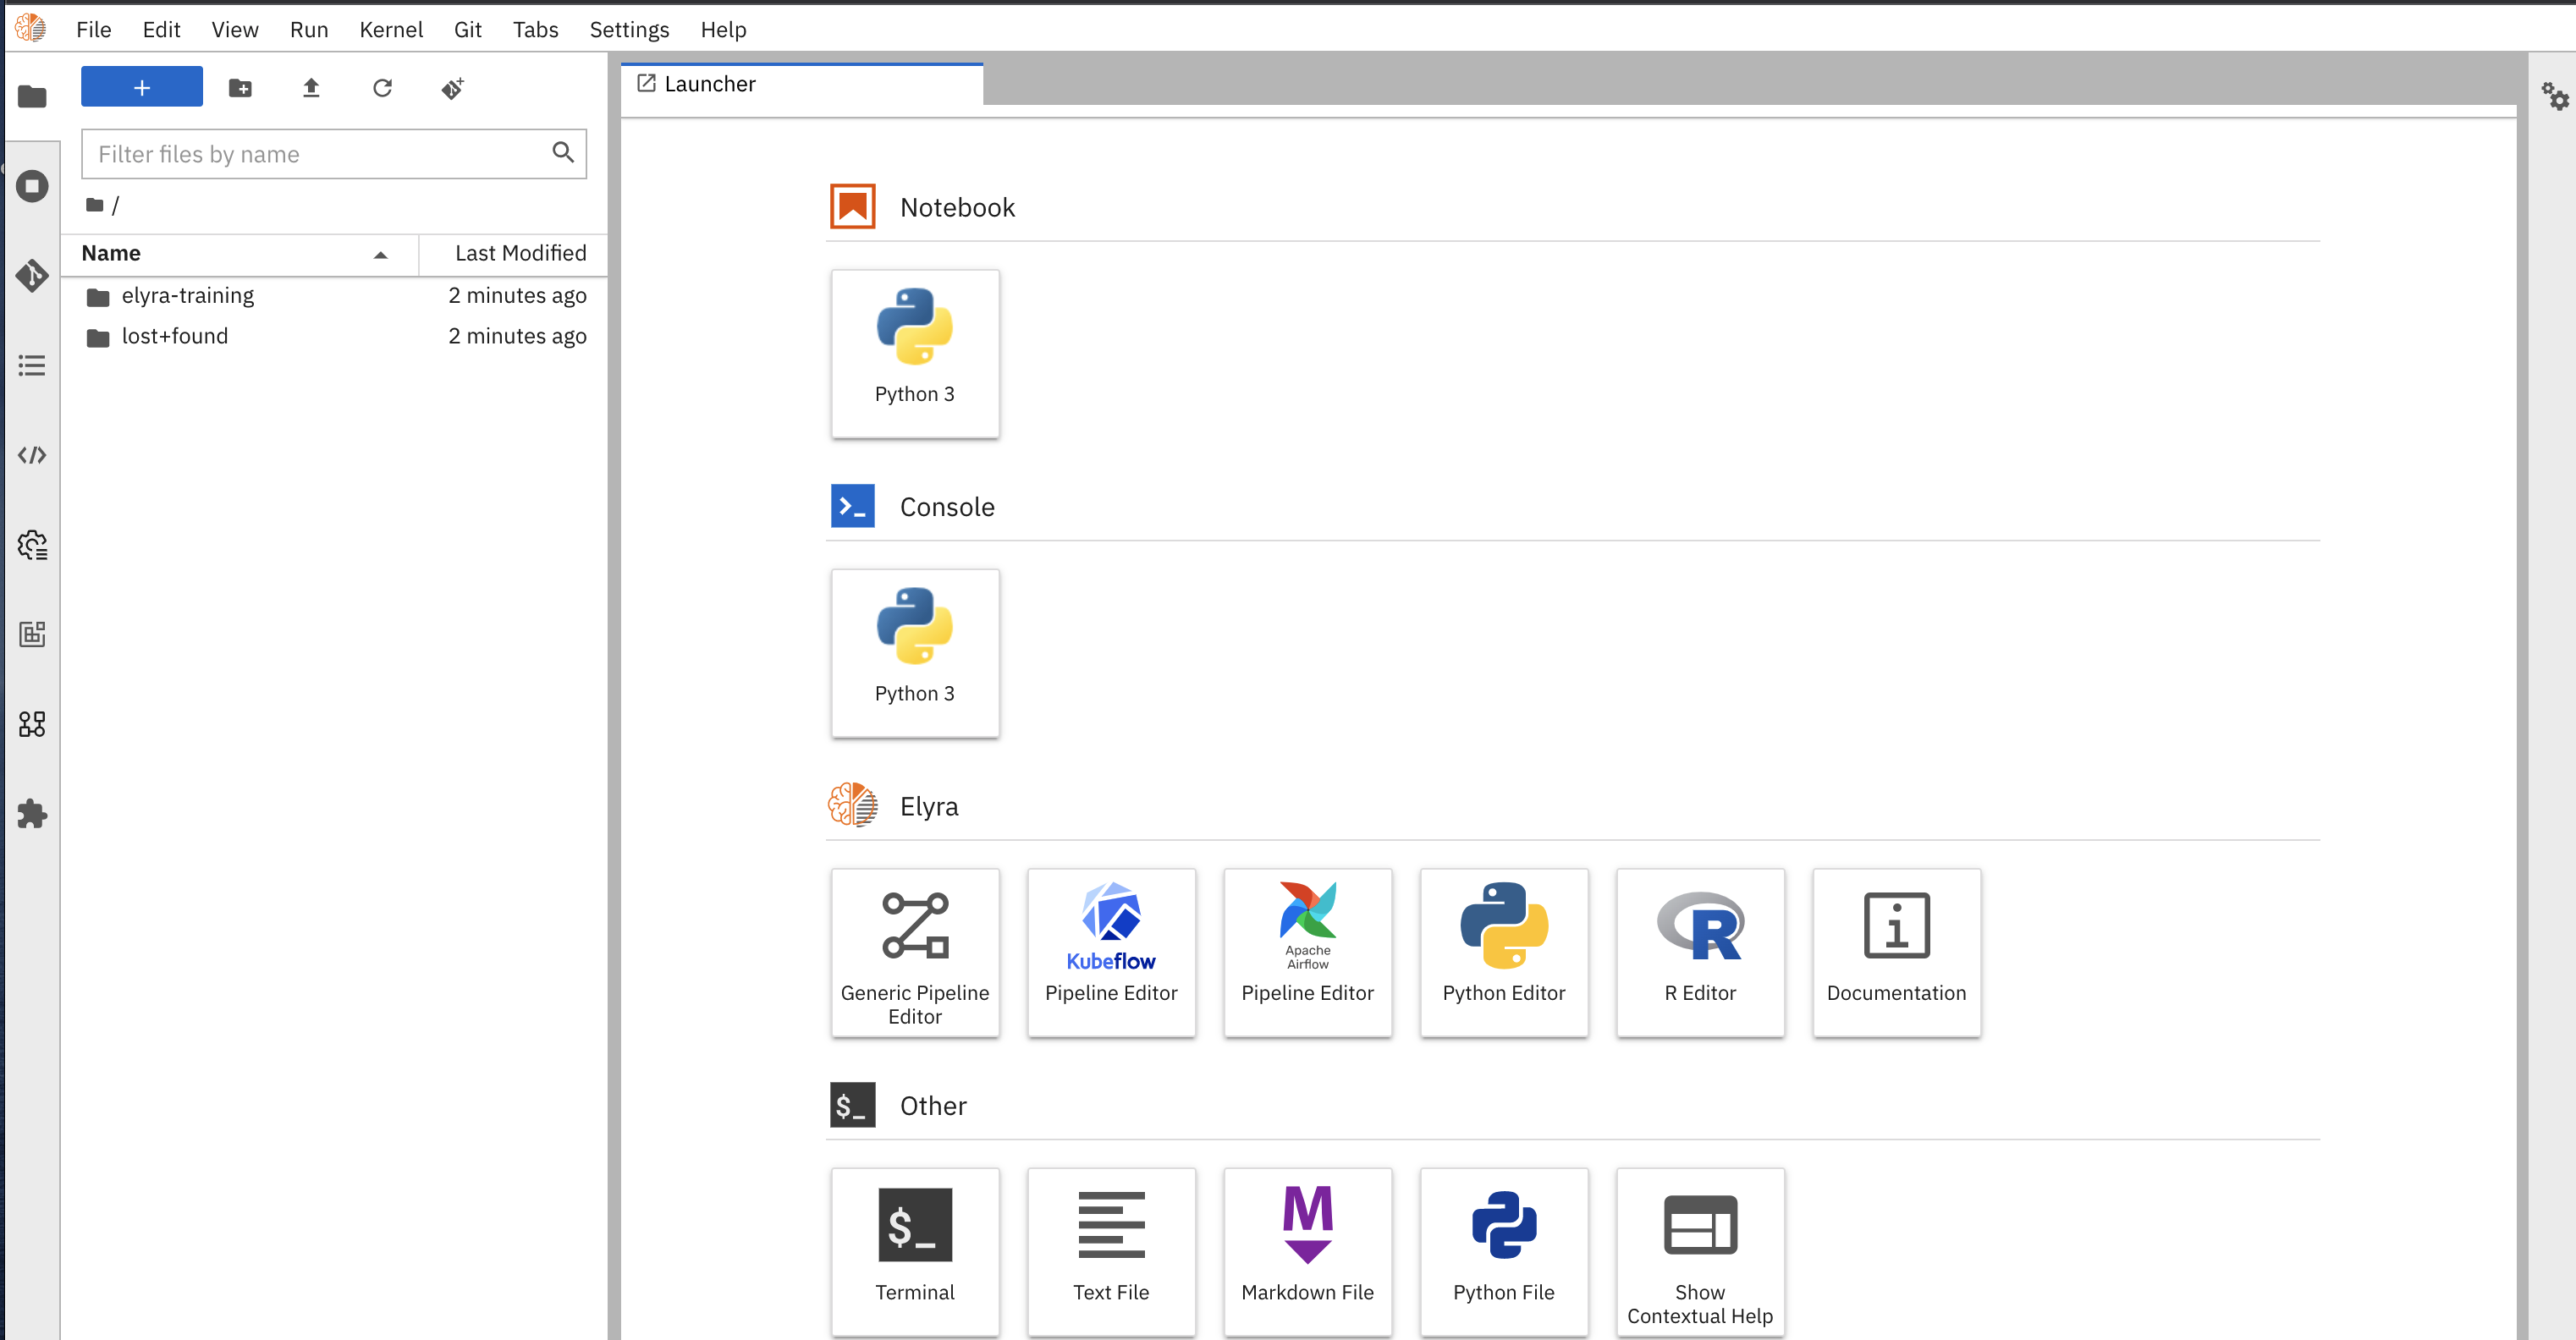 Elyra JupyterLab interface
Congratulations! You're ready to use Elyra. You've successfully created a volume and launched a Kubeflow notebook with Elyra. In the following steps you'll run your first example.
Step 3: Add a runtime configuration
You'll need to get some information from the AI Platform team, such as the Minio user name and password. Please make sure you are ready to contact the support channel.
To add a Kubeflow runtime compatible with AI Platform, follow these steps:
-
Connect the Elyra notebook (if not already connected) to open the Elyra Jupyter interface.
-
In the Elyra Jupyter interface, open the runtime configuration by doing the following:
- a.) Click on the Runtimes icon on the navigation bar
- b.) Click the + icon on the top right of the panel
- c.) Select New Kubeflow Pipelines runtime configuration
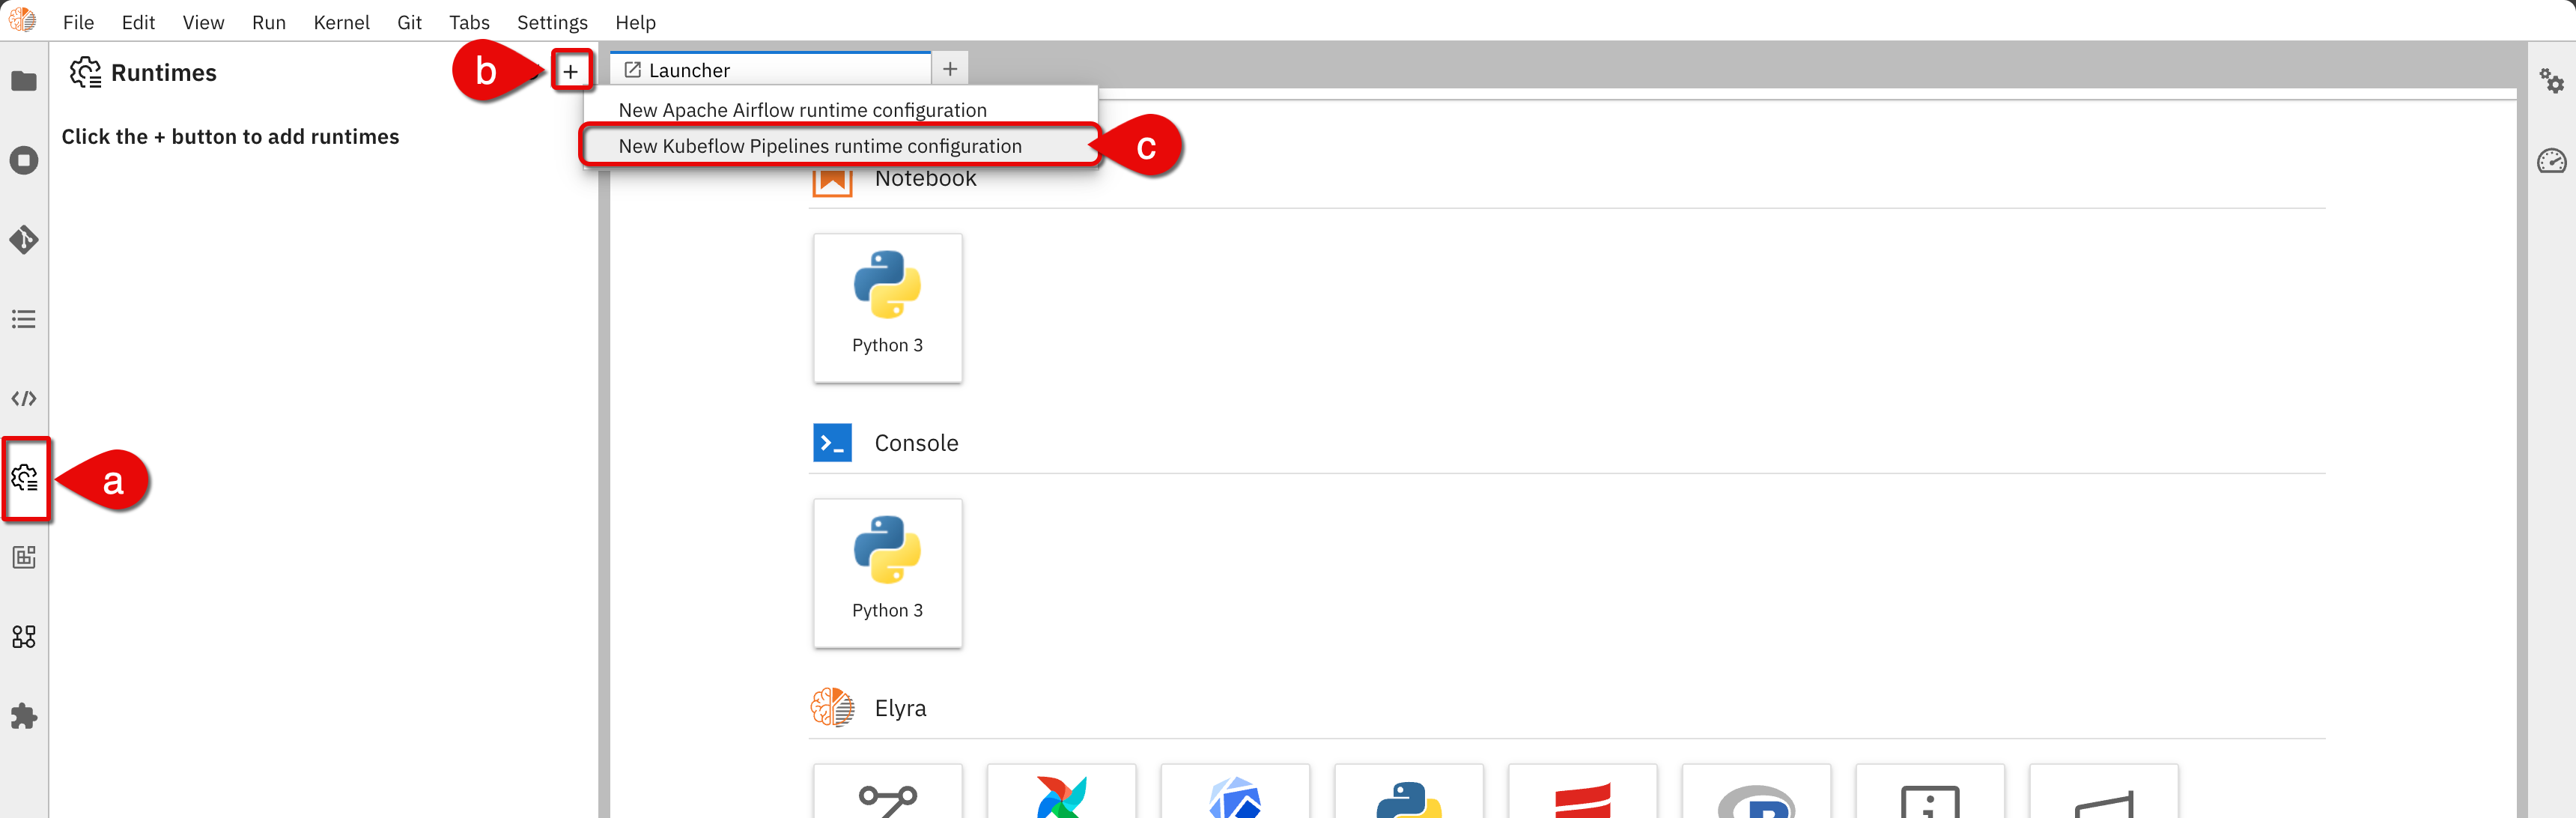
Accessing runtime configuration -
In the Add new Kubeflow Pipelines runtime configuration form, add the following:
- Name: any name
- Description: an adequate description
-
In the Kubeflow Pipelines section of the form, set fields as follows:
- Kubeflow Pipelines API endpoint:
http://ml-pipeline.kubeflow.svc.cluster.local:8888 - Public Kubeflow Pipelines API endpoint:
Enter the Kubeflow server, for example:https://shared.dev.aurora.equinor.com/pipelinehttps://balder.dev.aurora.equinor.com/pipeline- Or, enter the cluster URL you are working on with the
/pipelineextension
- Kubeflow Pipelines User Namespace: Enter the namespace you are working on
- Kubeflow Pipeline engine:
Argo - Authentication Type:
KUBERNETES_SERVICE_ACCOUNT_TOKEN - Kubeflow Pipelines API Endpoint Username: leave empty
- Kubeflow Pipelines API Endpoint Password or Token: leave empty
- Kubeflow Pipelines API endpoint:
-
In the Cloud Object Storage section, set fields as follows:
- Cloud Object Storage Endpoint:
http://minio-service.kubeflow:9000 - Cloud Object Storage Bucket Name:
mlpipeline-shared - Authentication Type:
USER_CREDENTIALS - Cloud Object Storage Secret: Leave field blank
- Cloud Object Storage Username: Get username from AI Platform team
- Cloud Object Storage Password: Get password from AI Platform team
note
You can also obtain this data yourself with Kubectl or Lens. There is a secret called
mlpipeline-minio-artifactin your namespace. Copy the unencrypted value for the keyAWS_SECRET_ACCESS_KEY.
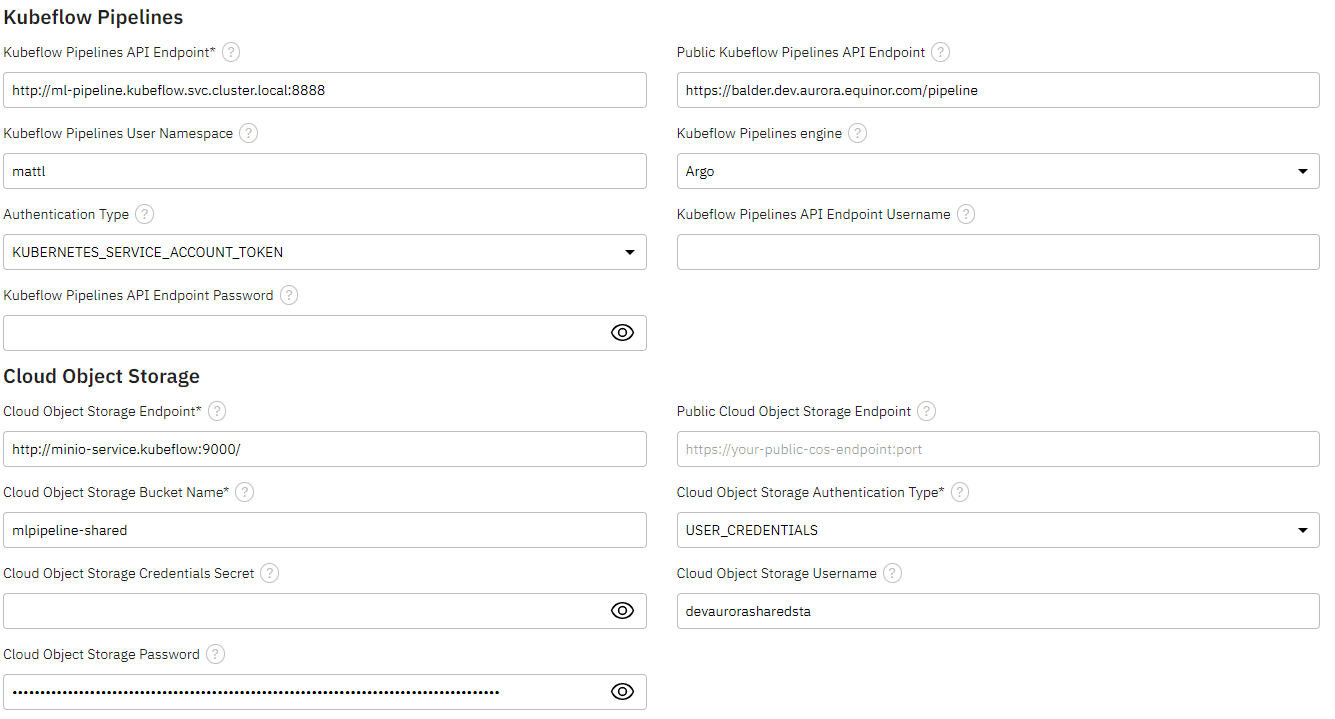 Runtime configuration settings form
 - Cloud Object Storage Endpoint:
-
Click on Save & Close. You will select this runtime to run the example later in the tutorial.
Step 4: Add a compatible image
In this step, you will add a runtime image to be used by the example workflow.
When building workflows such as pipelines you will need to choose a runtime image for each step in the flow. For security, AI Platform only lets you run images that are stored in an Aurora Azure Container Registry (ACR).
By default the images distributed with Elyra are approved for AI Platform. If you need to use custom images you need to add them to an AI Platform repository such as auroradevacr.
In this example you will configure a Pandas image that is already in the ACR.
-
In the Elyra Jupyter interface, do the following:
- a.) Click on the runtime images icon on the navigation bar
- b.) Click + on the top right of the panel
 Create new runtime image
 -
In the Add new Runtime Image, set fields as follows:
- Name:
Aurora Pandas 1.1.1(this can be any name, but it is best practice to refer to the original name) - Description: enter a description that you will select this from a dropdown later
- Image Name:
auroradevacr.azurecr.io/amancevice/pandas:1.1.1
noteLeave other fields blank. However, your custom images can later use the authorization fields.
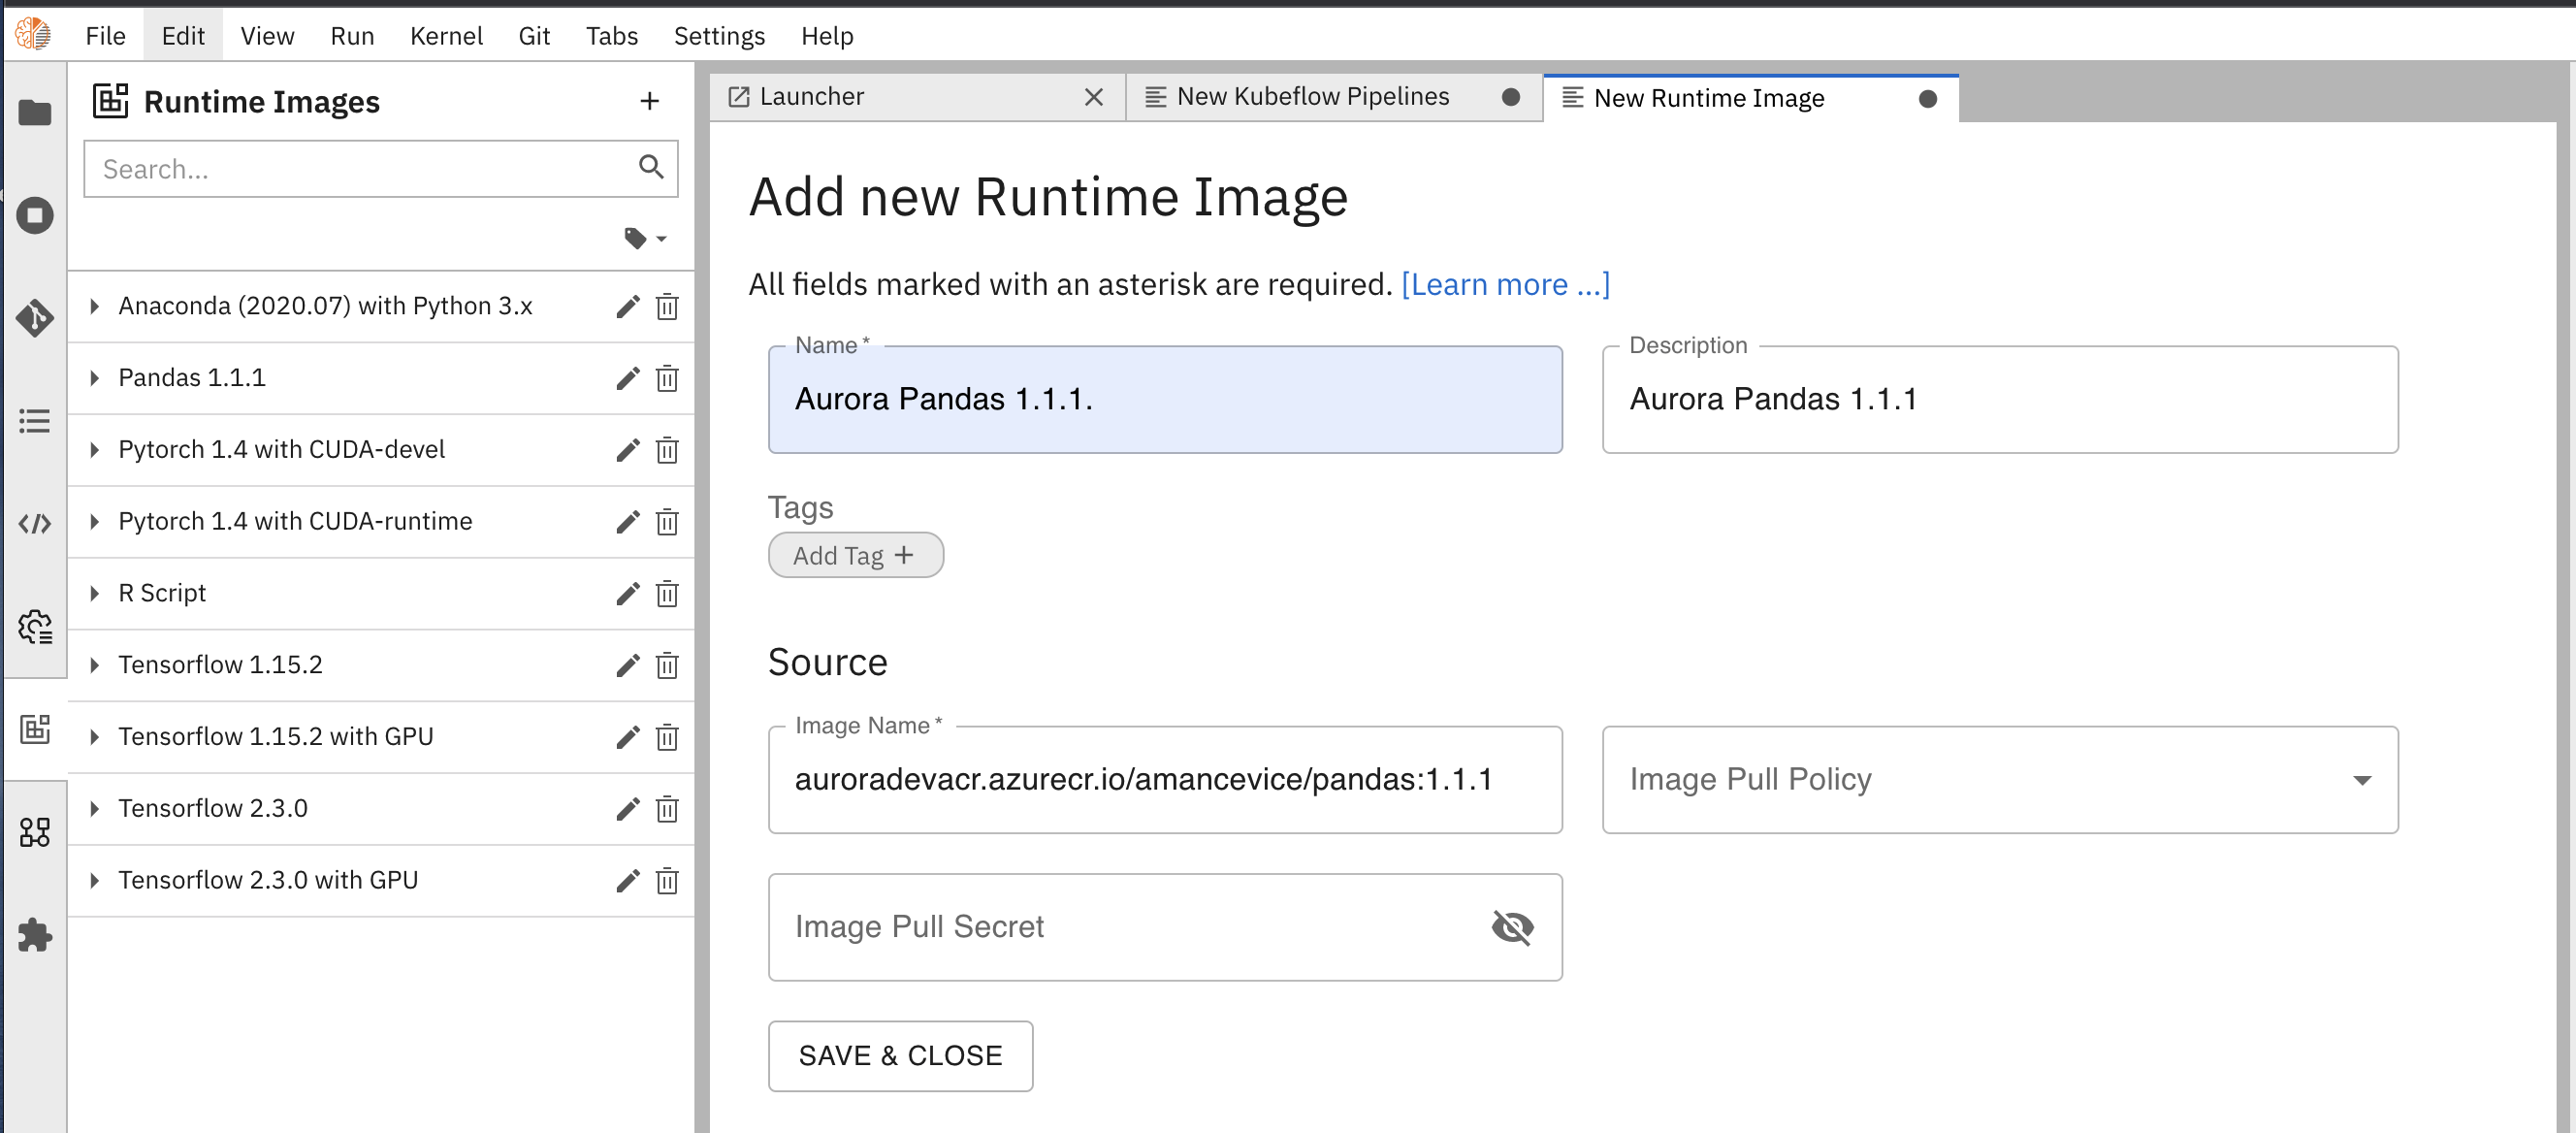 New runtime image settings
 - Name:
-
Click Save & Close. The image will now be in the list of images.
You are now ready to run an example.
Step 5: Clone the example repository
To clone a repository with standard examples, do the following:
-
In the Elyra JupyterLab interface, do the following:
- a.) Click the Git icon on the navigation bar
- b.) Click Clone a Repository
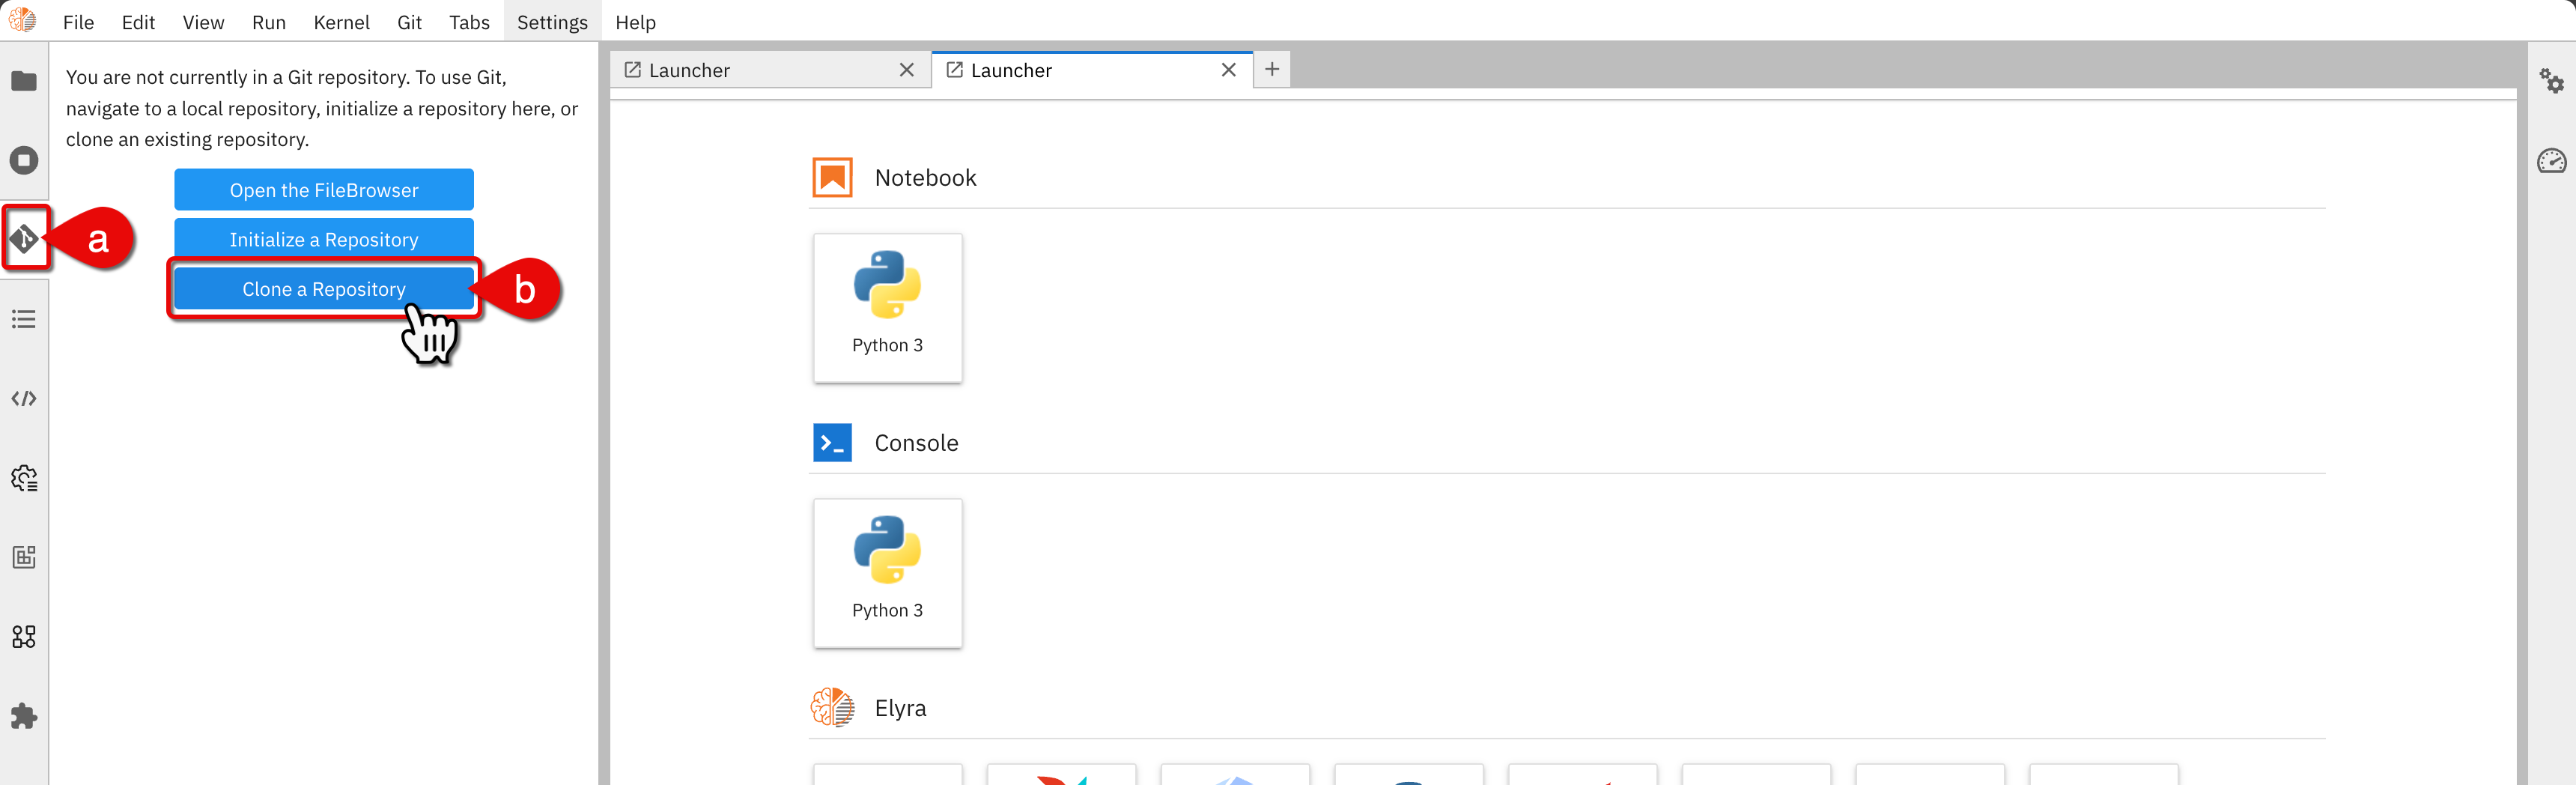 Clone a repository
 -
In the Clone a repo dialog box, enter the following URI:
https://github.com/elyra-ai/examples.git. -
Click Clone
The repository contains Elyra functionality examples. There, you can find examples for Kubeflow, Airflow, and catalog components. You can check the Elyra documentation to learn more.
Step 6: Run the example
In this step, you'll need to edit the example to run with the compatible runtime images.
We will be working with a generic Kubeflow pipelines example.
-
In the Elyra Jupyter interface, do the following:
- a.) Click to the notebook file explorer icon
- b.) Click the
examplesfolder
-
From
examples, go to the/pipelines/run-generic-pipelines-on-kubeflow-pipelinesfolder.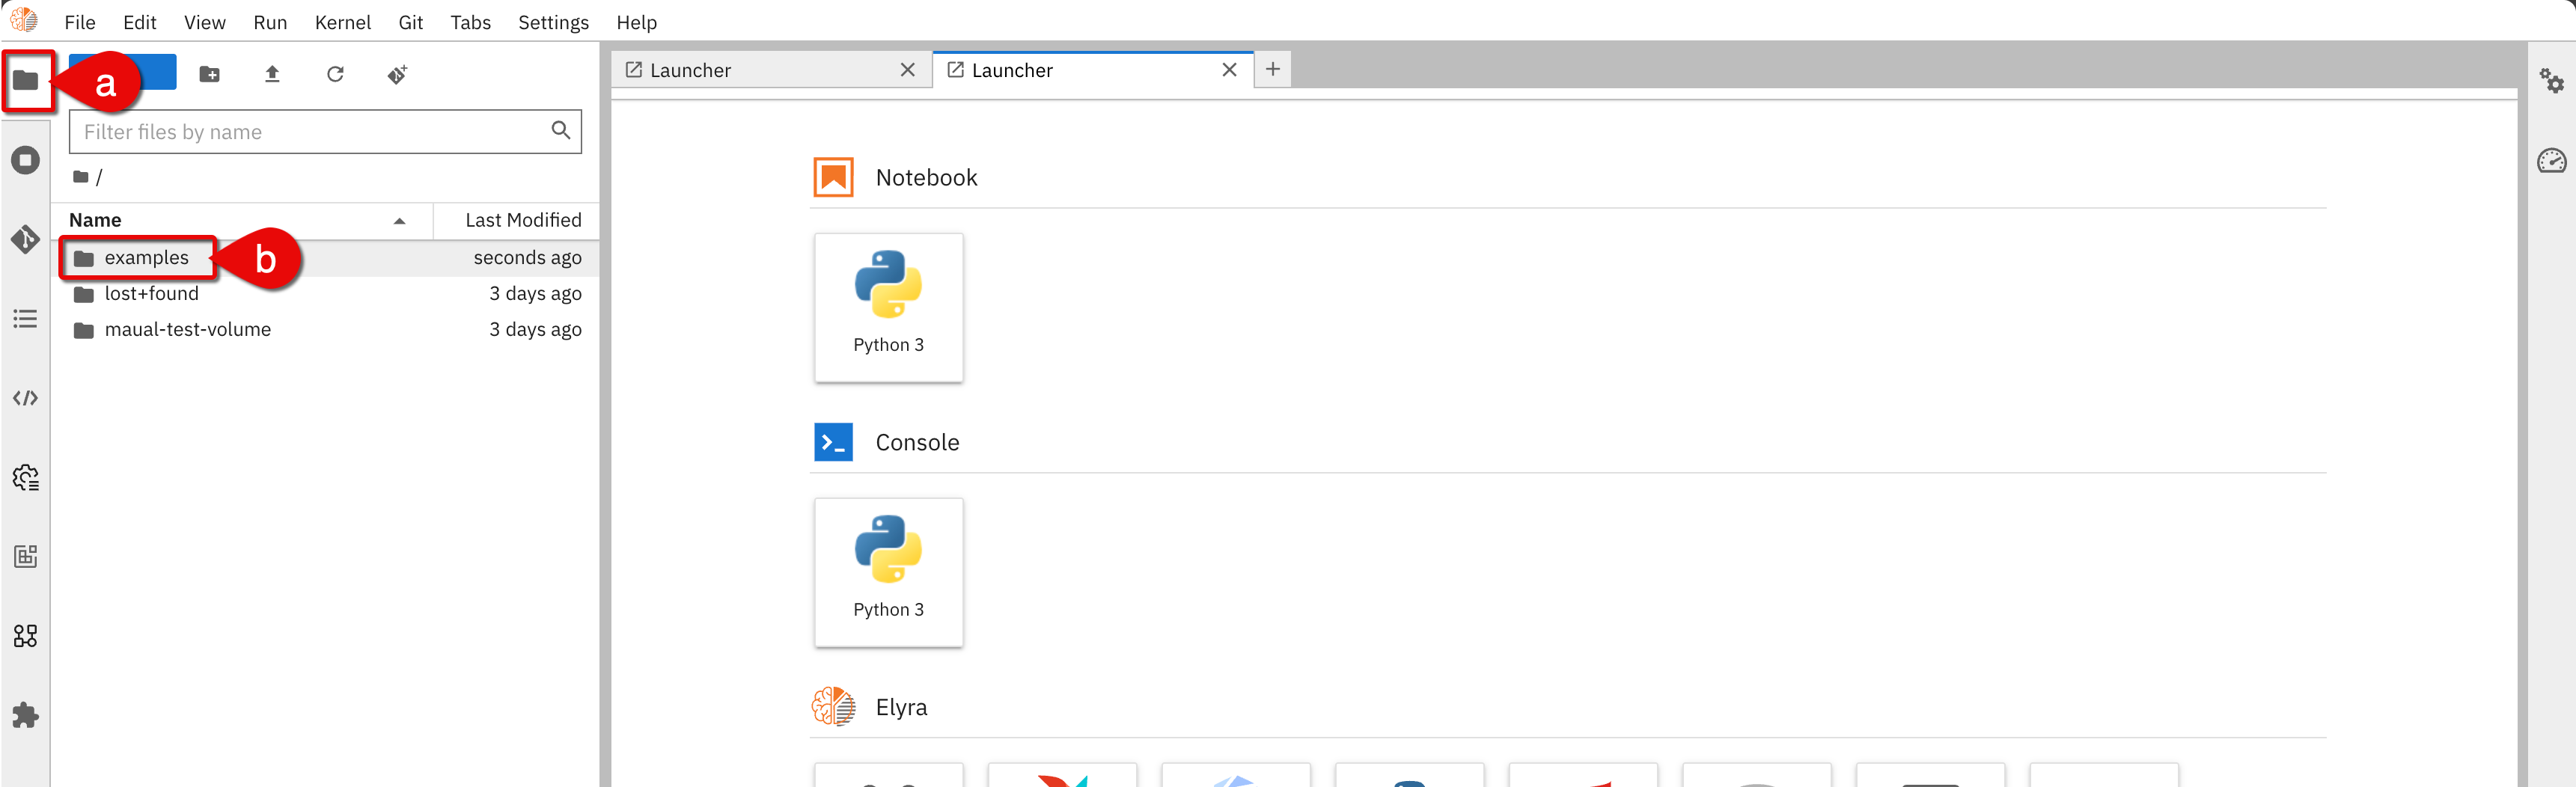 Notebook examples
 -
Open the
hello-generic-world.pipelinefile.noteIf a Migrate pipeline dialog box opens up, click OK.
-
You will see the example workflow as shown below. You can drag and drop elements in the workflow, but for this tutorial leave the design as it is.
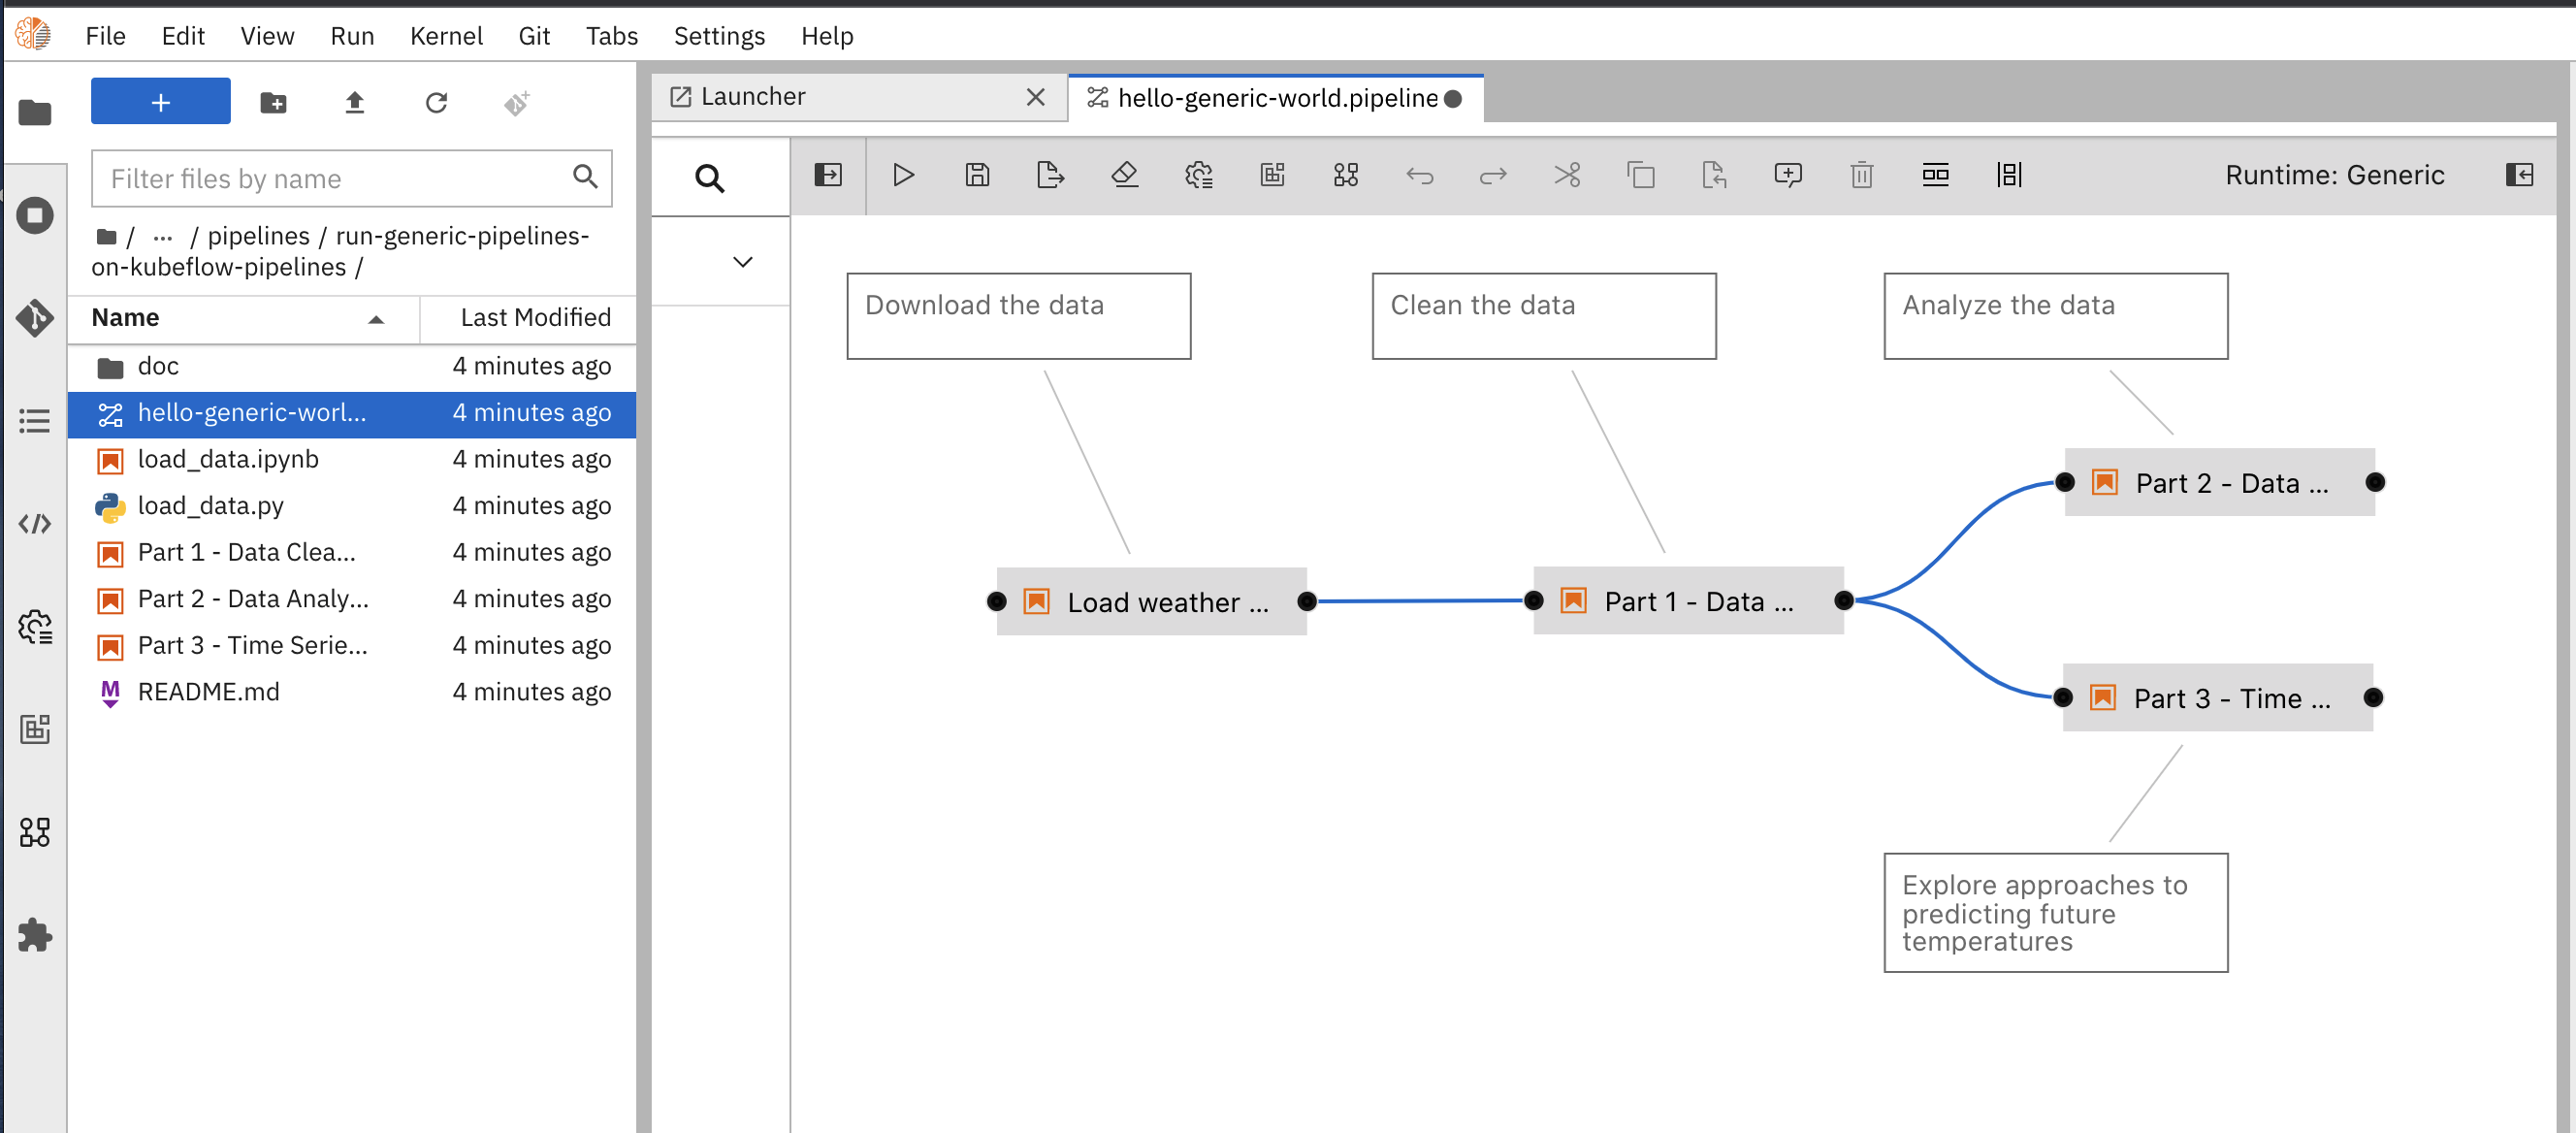 Workflow example
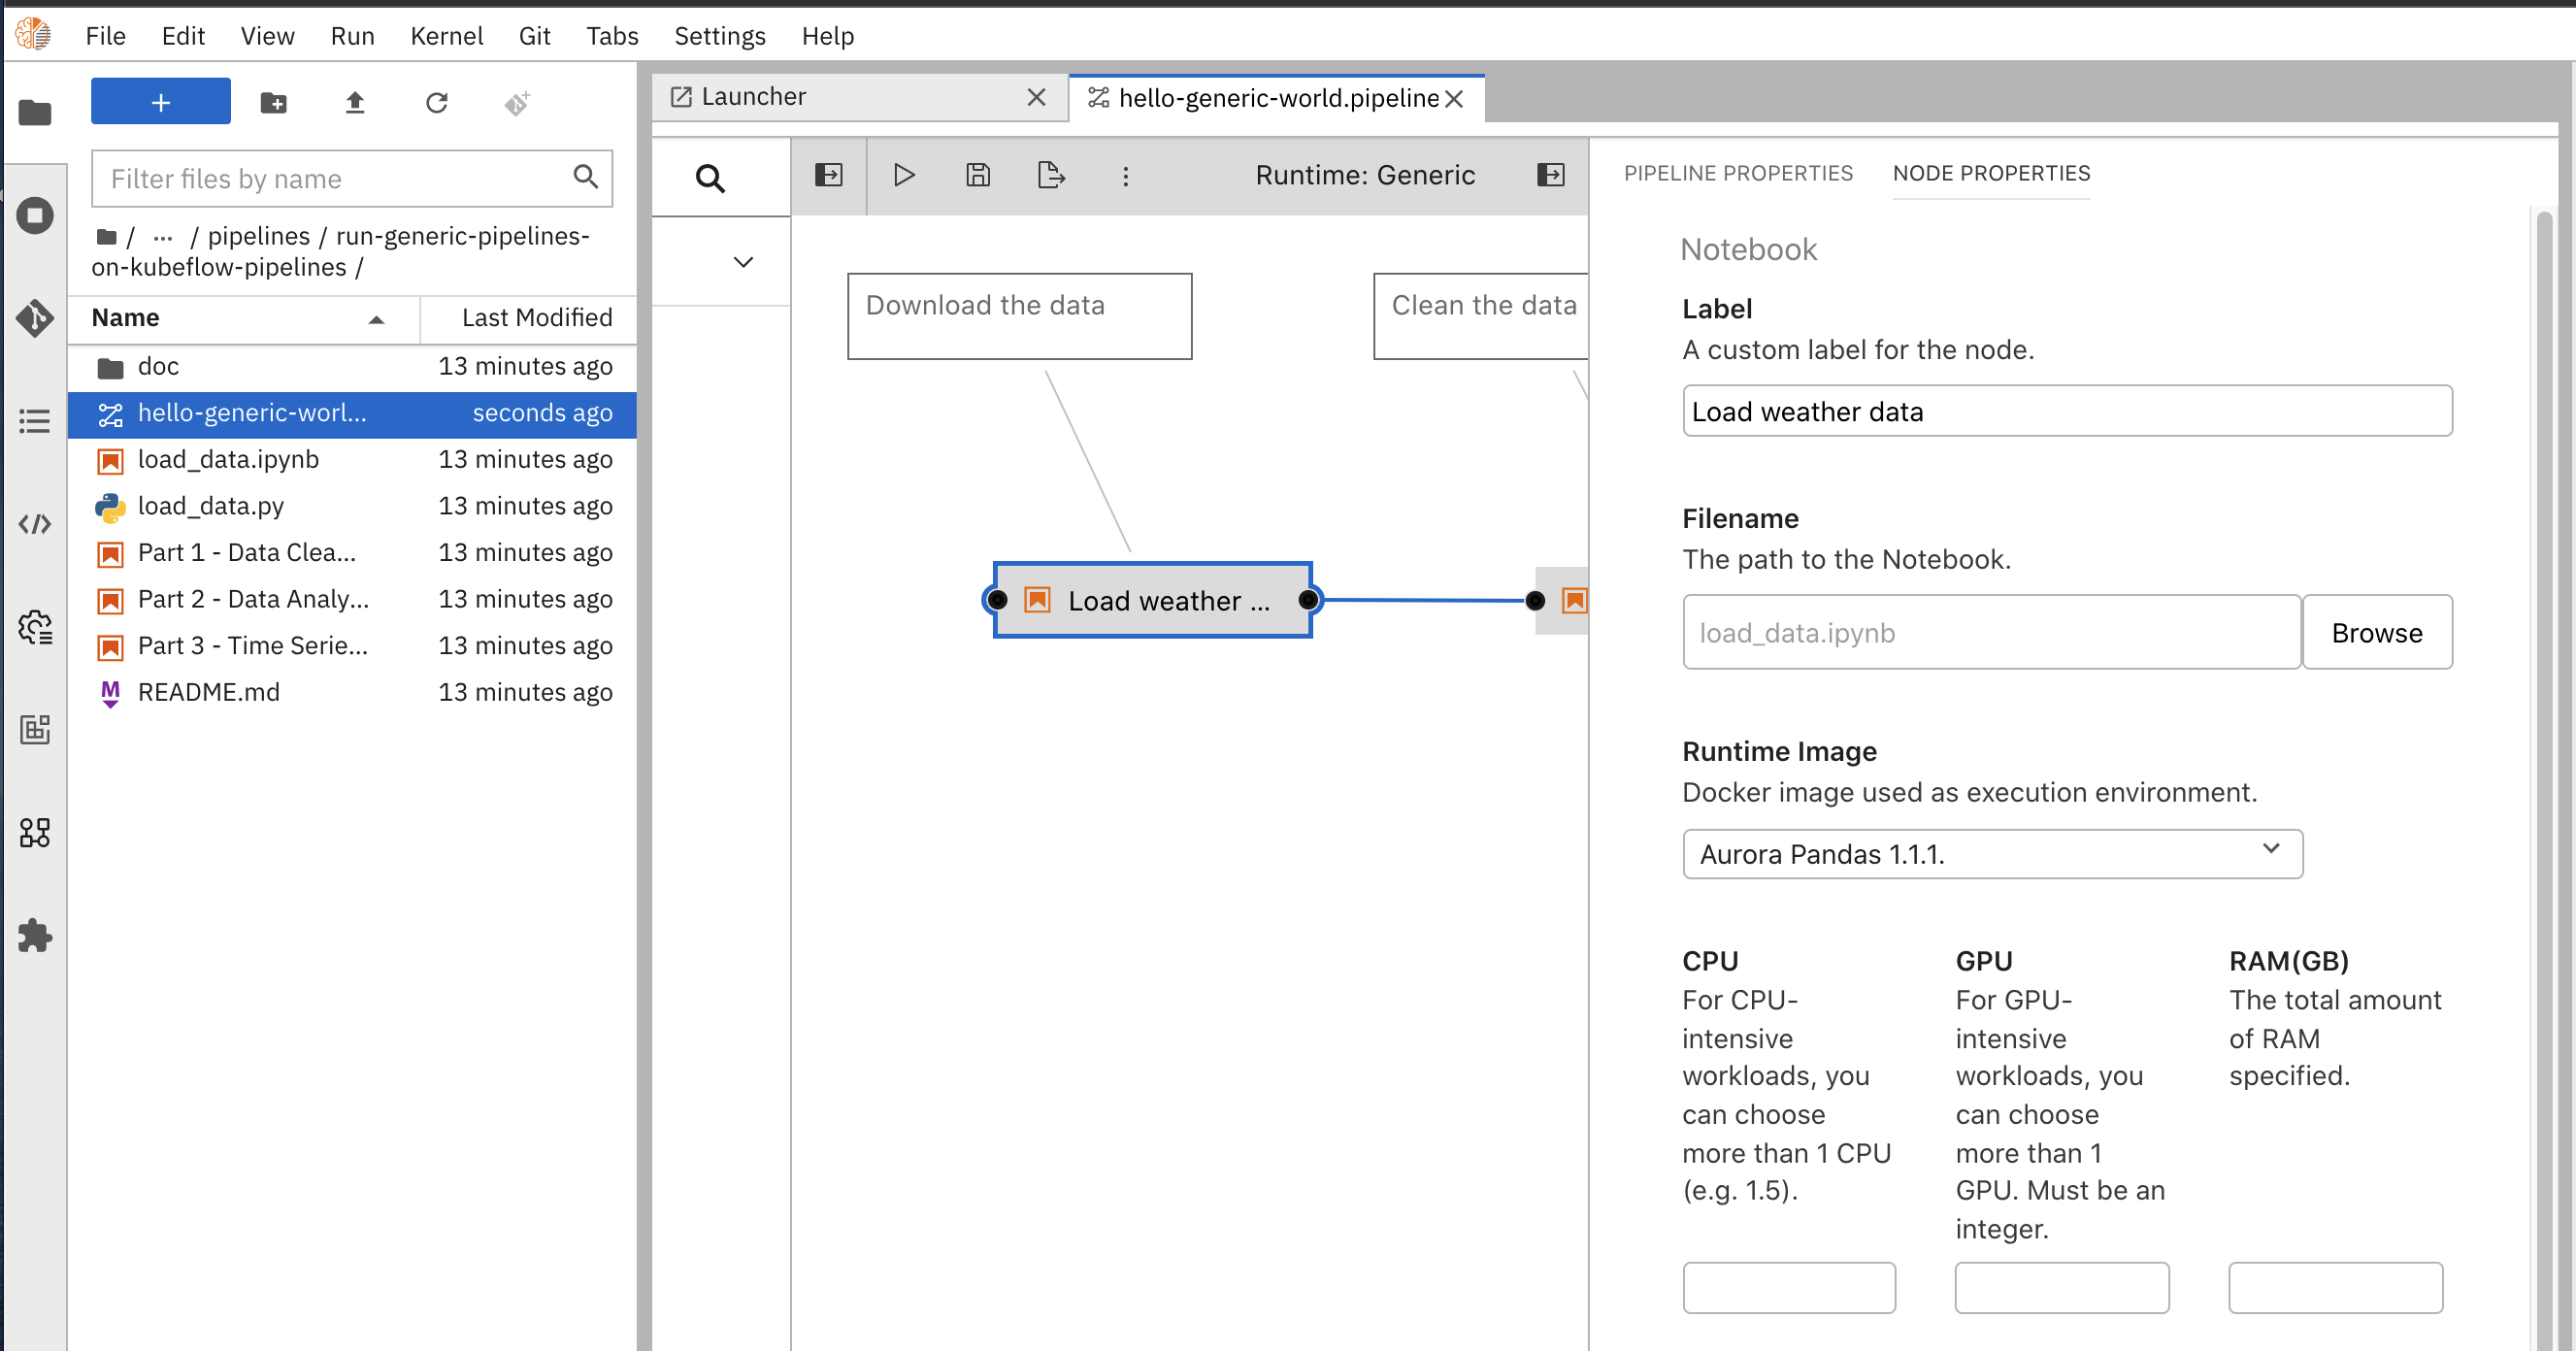
- Let's edit the workflow to use our runtime images.
- a.) Right-click in a pipeline's individual nodes (notebooks / scripts)
- b.) In the menu, select Open Properties to display the Node Properties panel
- You can see several fields in the Node Properties panel, such as Filename, Runtime Image, CPU, GPU, dependencies, output files and so on.
For this example, we only want to change the image we created previously. From the Runtime Image dropdown menu, selectAurora Pandas 1.1.1. If the image is not listed you may need to close and open the workflow. Check also the image is listed in Runtime Images. - Repeat the same process for each step in the workflow.
Remember that the workflow allows you to have different images for each steps. But, for this example we are using only one, but it can be any working image and it is suitable for the code in the step.
 Node properties panel
-
To save the pipeline, go to File, and select, Save Pipeline.
-
To run the workflow, select the run arrow in the top navigation bar.
-
From he Run pipeline dialog box:
- a.) Enter a name or leave the name as it is
hello-generic-world - b.) Choose Kubeflow Pipelines in the dropdown Runtime Platform
- c.) Choose the runtime configuration you created previously
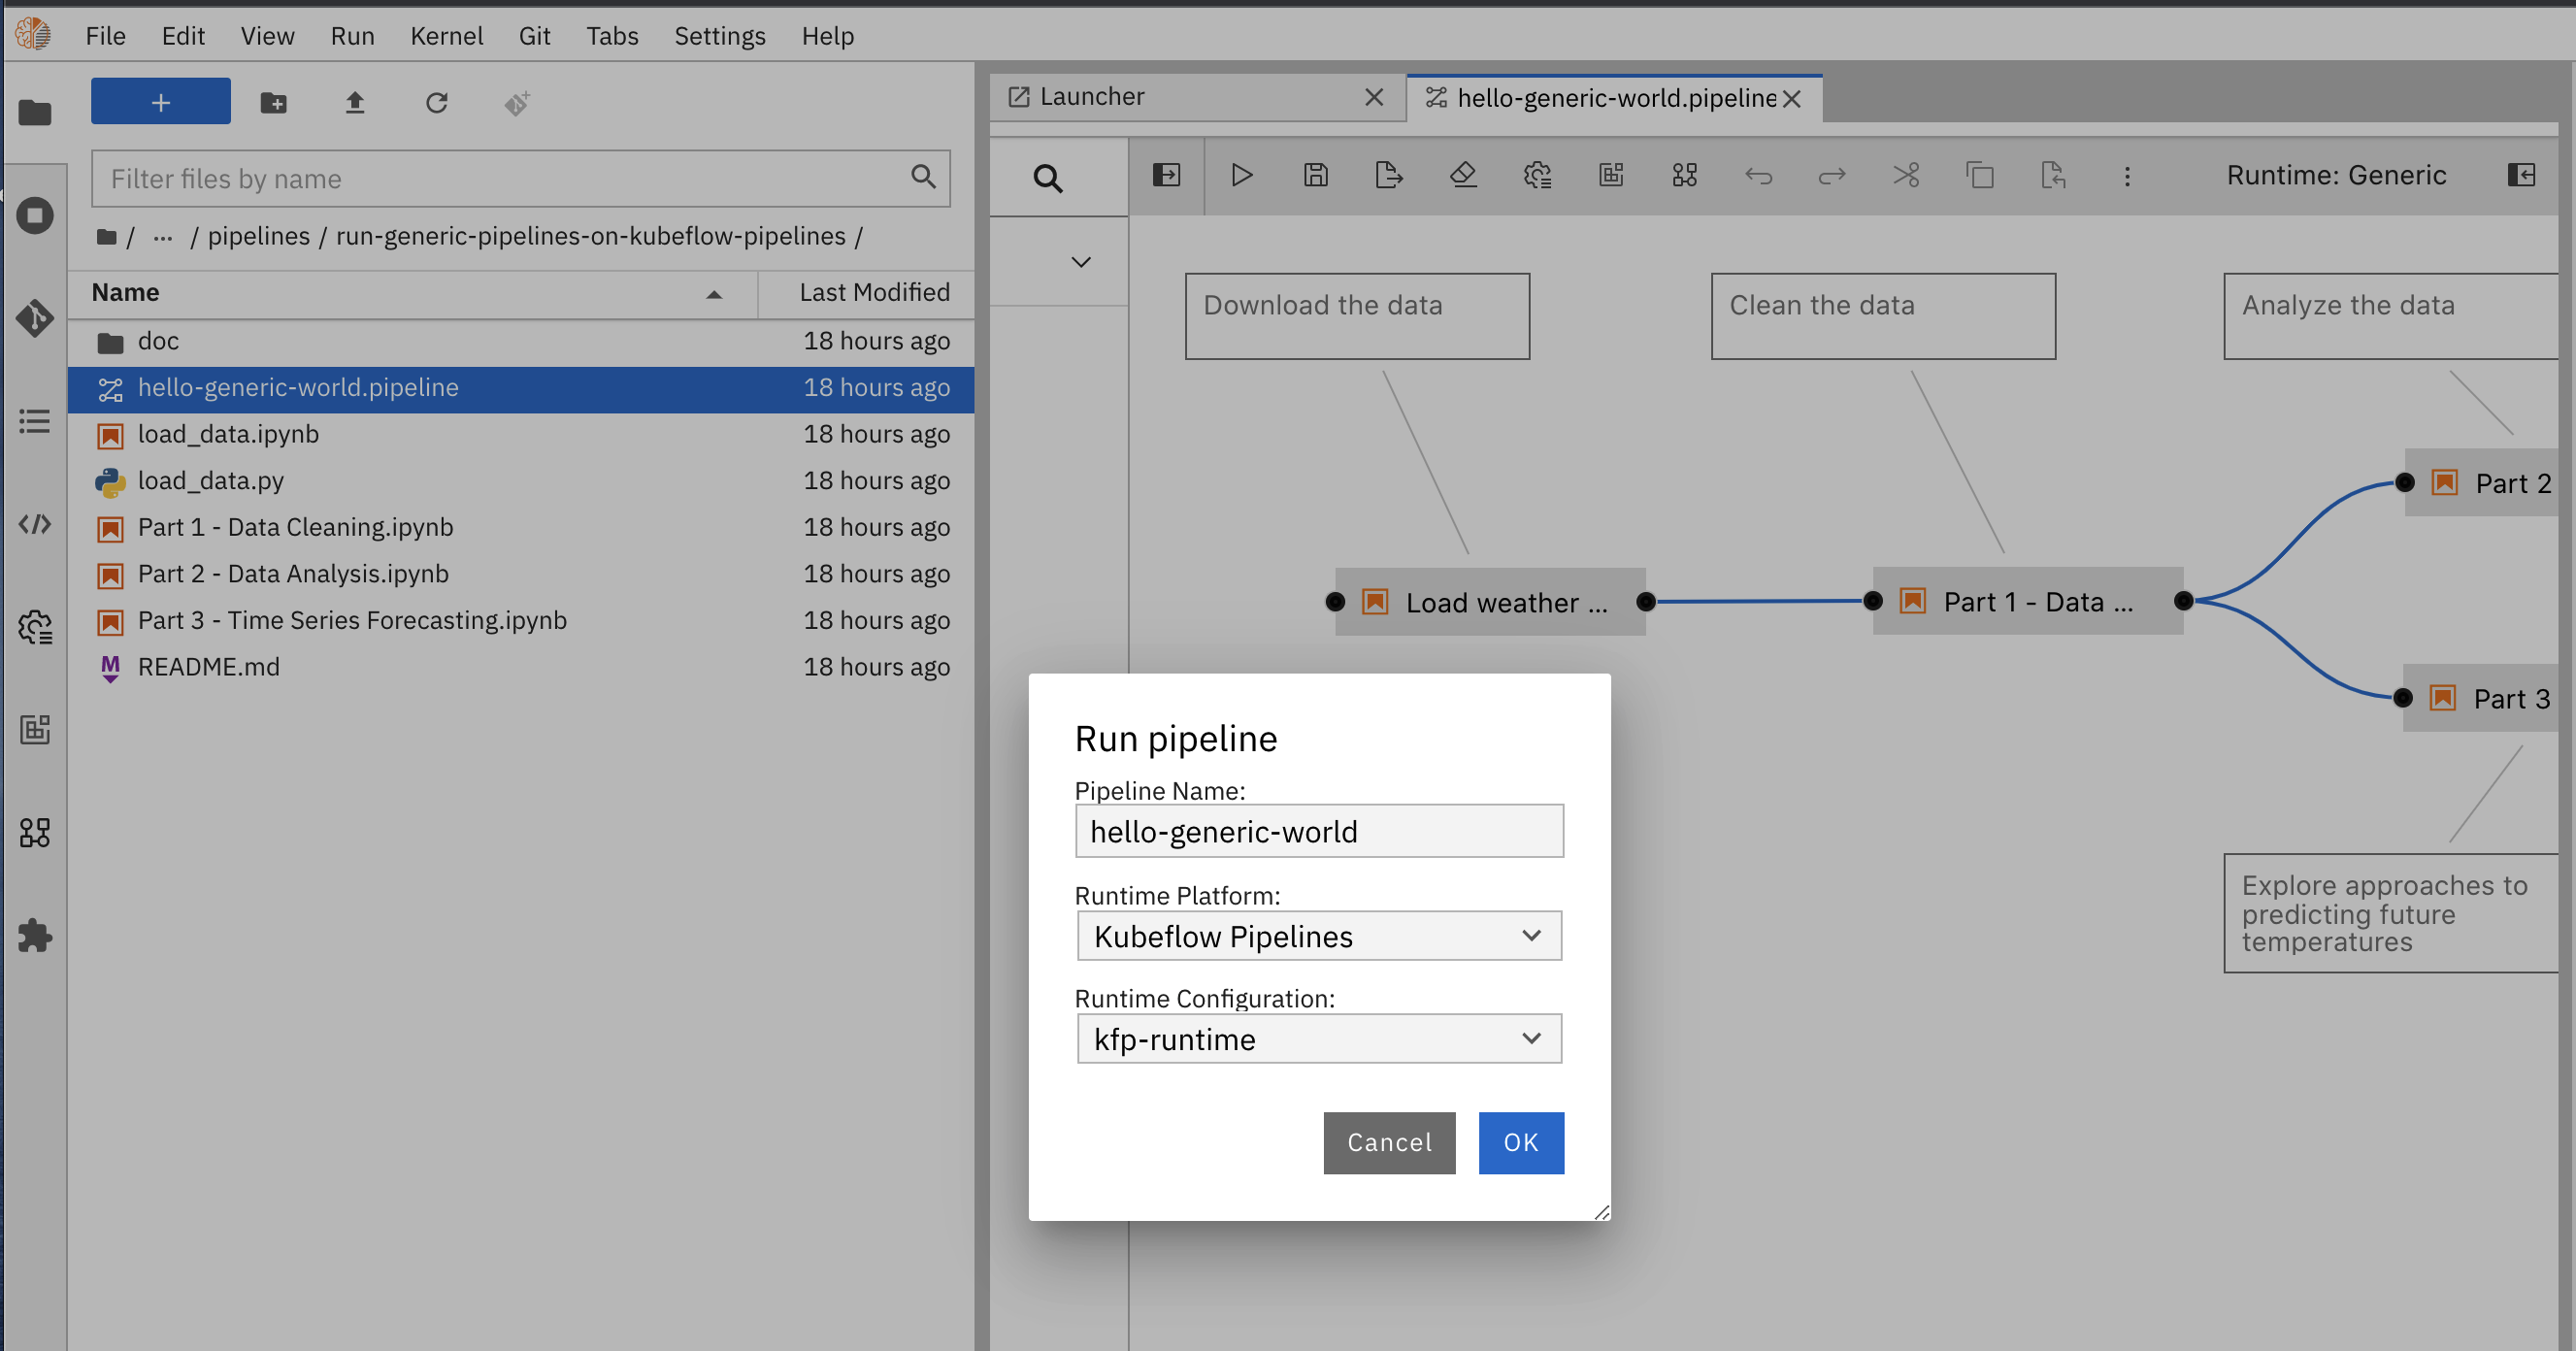 Run pipeline
 - a.) Enter a name or leave the name as it is
-
Click Ok. You'll see a dialog box with a message that the process might take some time.
-
If the settings are successful you'll see a success dialog box as shown in the image below.
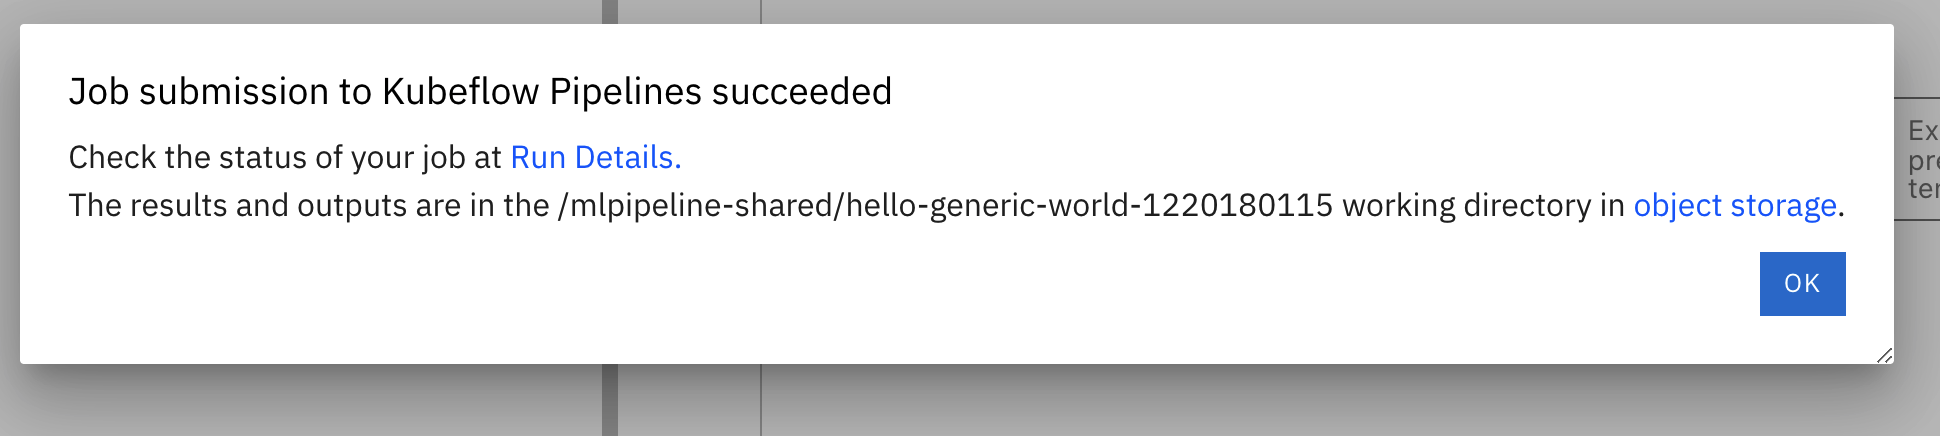 Job submission success
-
Don't close this dialog box since we'll be using the Run Details link to monitor the pipeline run.
-
If you want to export the pipeline, click the export icon. After clicking the export icon, you can chose to export as either a Python or YAML file:
- a.) Export a pipeline file as
Python DSL.
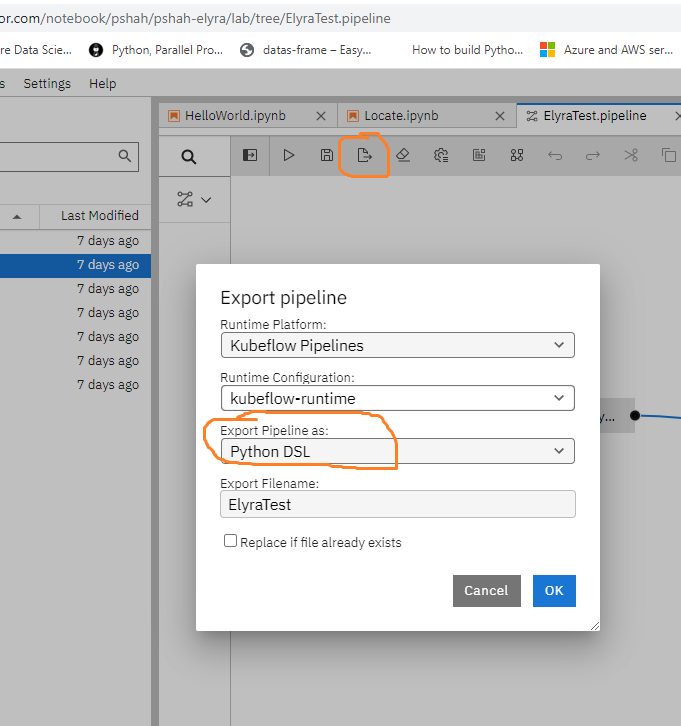 Export pipelinenote
If you export as a Python DSL file, you may add the code snippet below to execute the Elyra Kubeflow pipeline directly using this Python script.
Elyra Python scriptclient = kfp.Client()
EXPERIMENT_NAME = 'elyratest'
try:
experiment = client.get_experiment(experiment_name=EXPERIMENT_NAME)
except:
experiment = client.create_experiment(EXPERIMENT_NAME)
arguments = {}
run_name = pipeline_func.__name__ + ' run'
run_result = client.run_pipeline(
experiment.id,
run_name,
pipeline_filename,
arguments
)- b.) Export a pipeline as a YAML file.
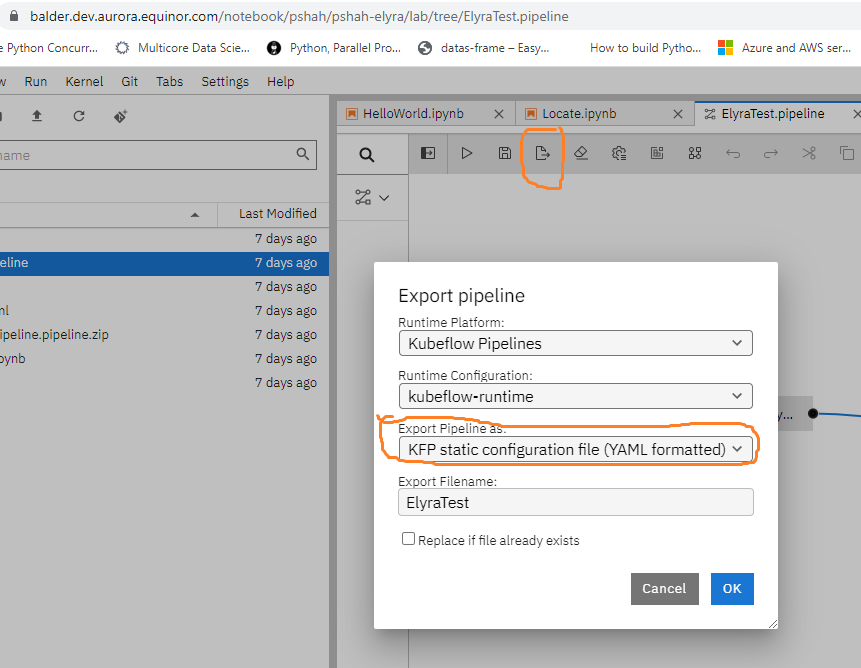 Elyra YAML filenote
You can later upload the YAML file using the Kubeflow UI pipelines option and then execute pipeline runs from the Kubeflow UI.
- a.) Export a pipeline file as
Step 7: Monitor the pipeline run
In this step, you'll run the example and monitor it in the workflow.
The pipeline run was submitted to Kubeflow Pipelines via the API.
You can use the link in the success dialog box from the previous section. Or you can go to Kubeflow and look for the experiment by the name hello-generic-world.
To monitor the pipeline from Kubeflow, do the following:
- Click on the link Run Details in the success dialog box.
- You will be taken to Kubeflow where you can see the run.
- It should look like the image below. If you see any errors you may check the logs selecting the box in the workflow and the Logs page on the right.
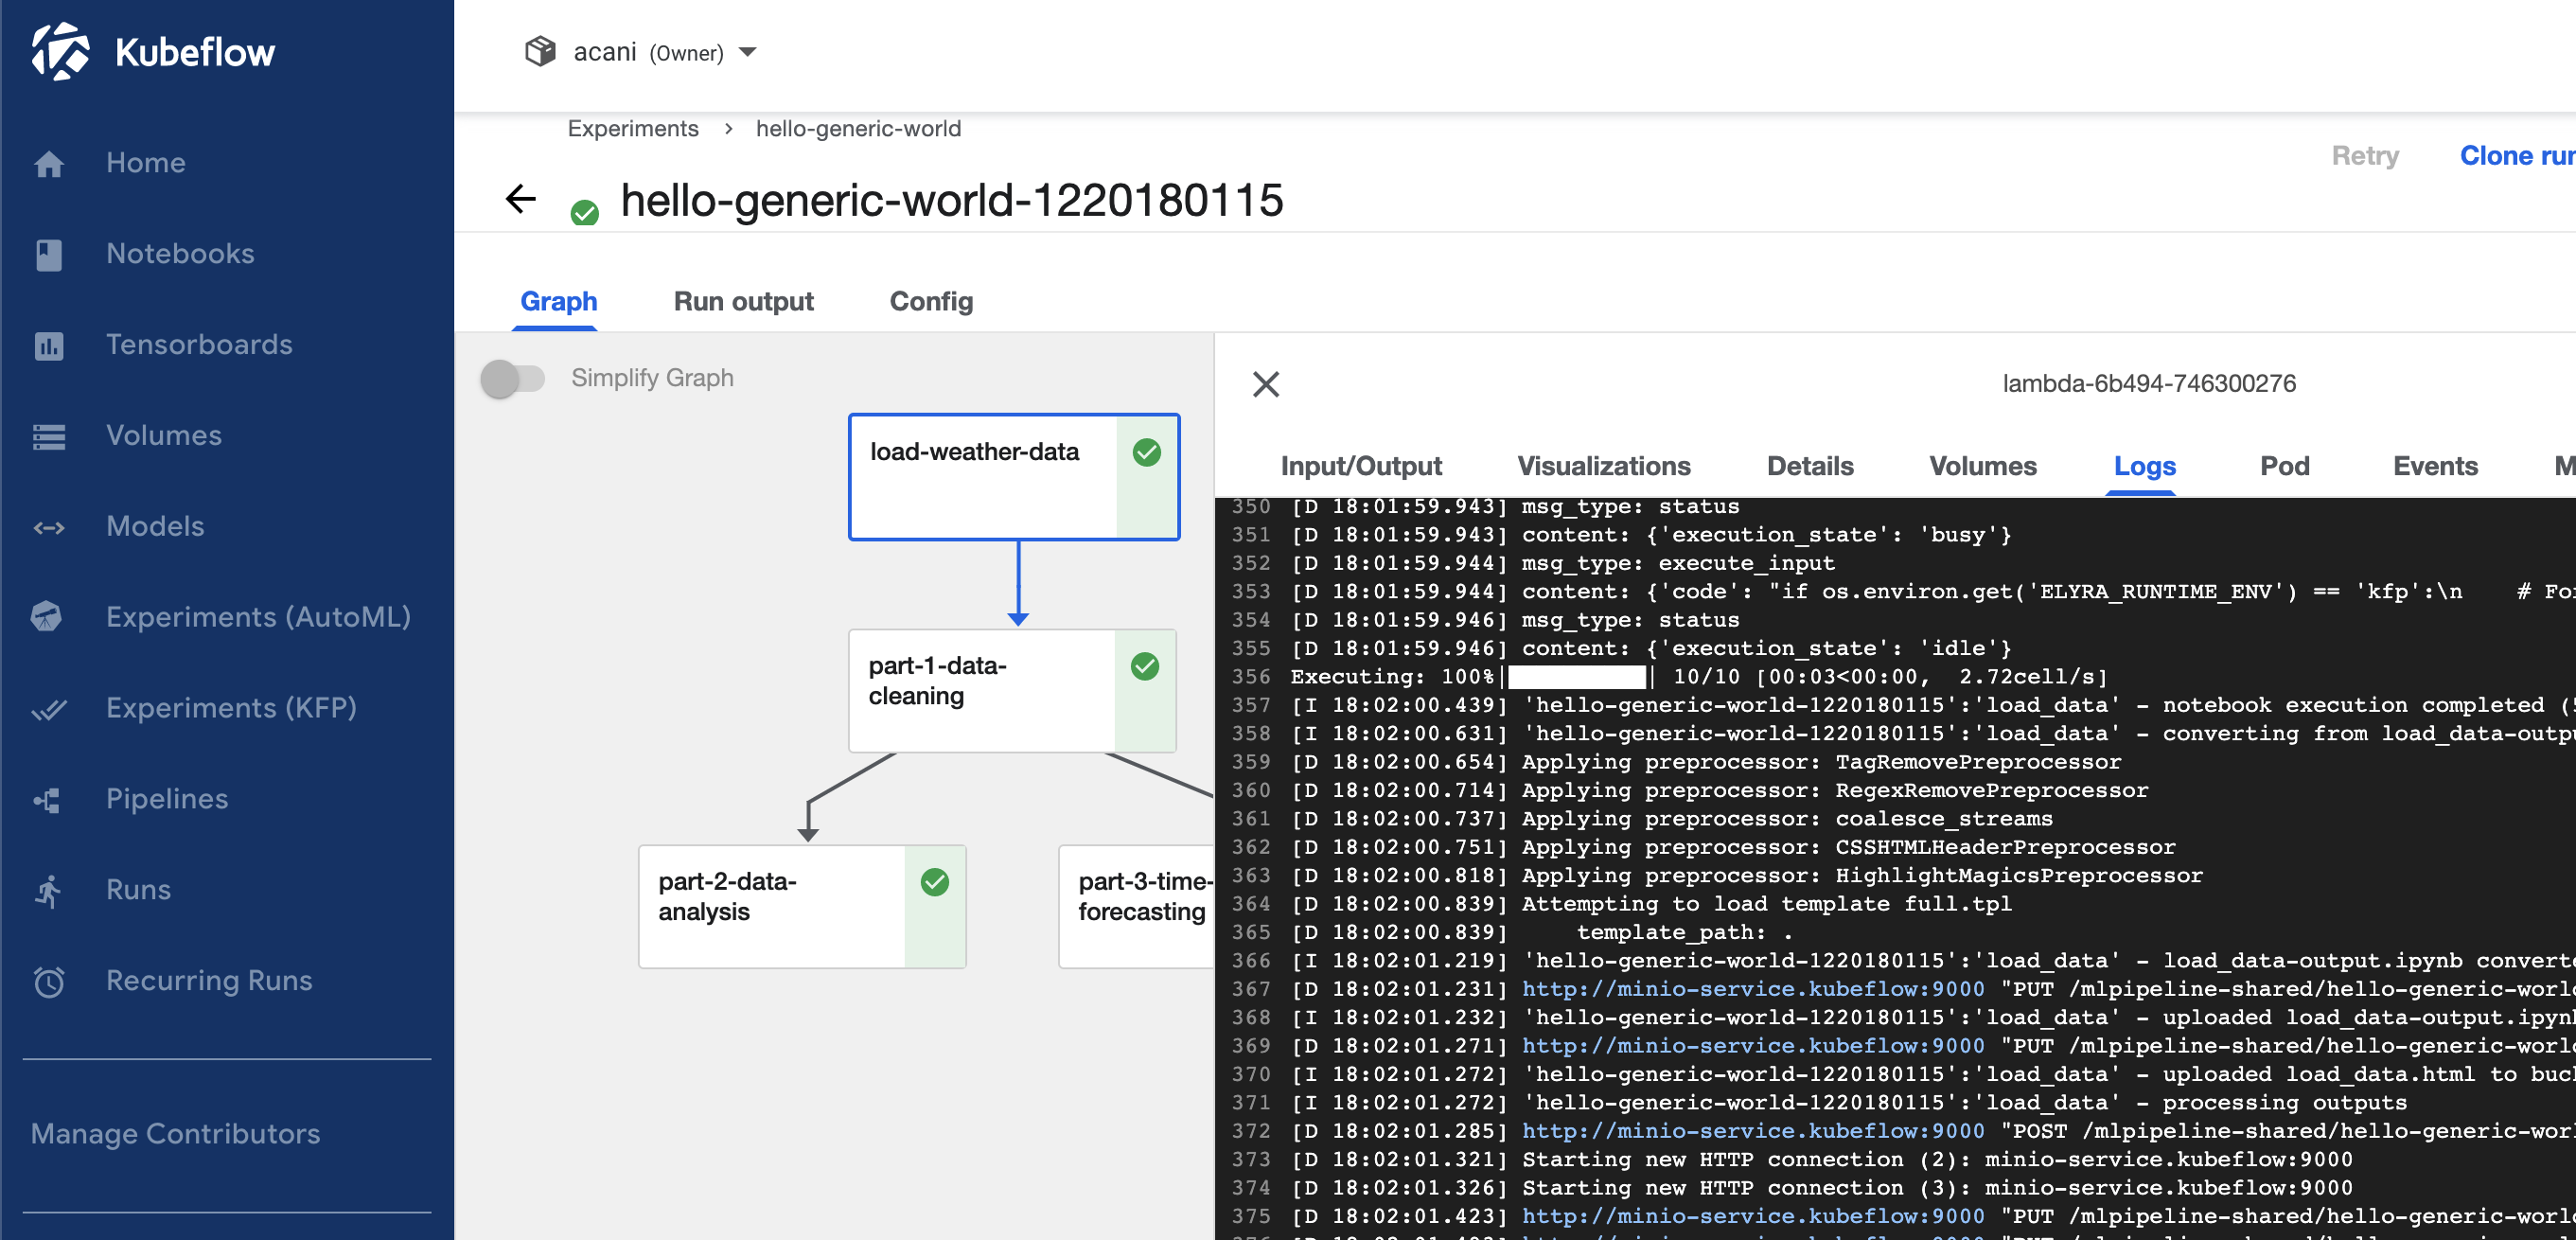 Elyra monitor example
You ran your first Elyra workflow. Visit the Elyra documentation site to learn more, such as custom components or the use of code snippets.